Introduction
This lab provides instructions for developing applications using AWS Lambda.
AWS Lambda
AWS Lambda is an event-driven, serverless computing platform. It is a computing service that runs code in response to events and automatically manages the computing resources required by that code. AWS Lambda natively supports Java, Go, PowerShell, Node.js, C#, Python, and Ruby code, and provides a Runtime API allowing the use any additional programming languages to develop functions.
AWS Lambda can be used to extend other AWS services with custom logic or to create backend services that operate at AWS scale, performance, and security. It is a stateless runtime environment.
Run your First Serverless Application
|
Note
|
This section is an adapted version of the Getting Started tutorial provided by AWS. |
In this section, you will learn the basics of running code on AWS Lambda without provisioning or managing servers. More specifically, you will learn
-
how to create a Hello World Lambda function using AWS Lambda console
-
how to manually invoke the Lambda function using sample event data
-
to review the output metrics
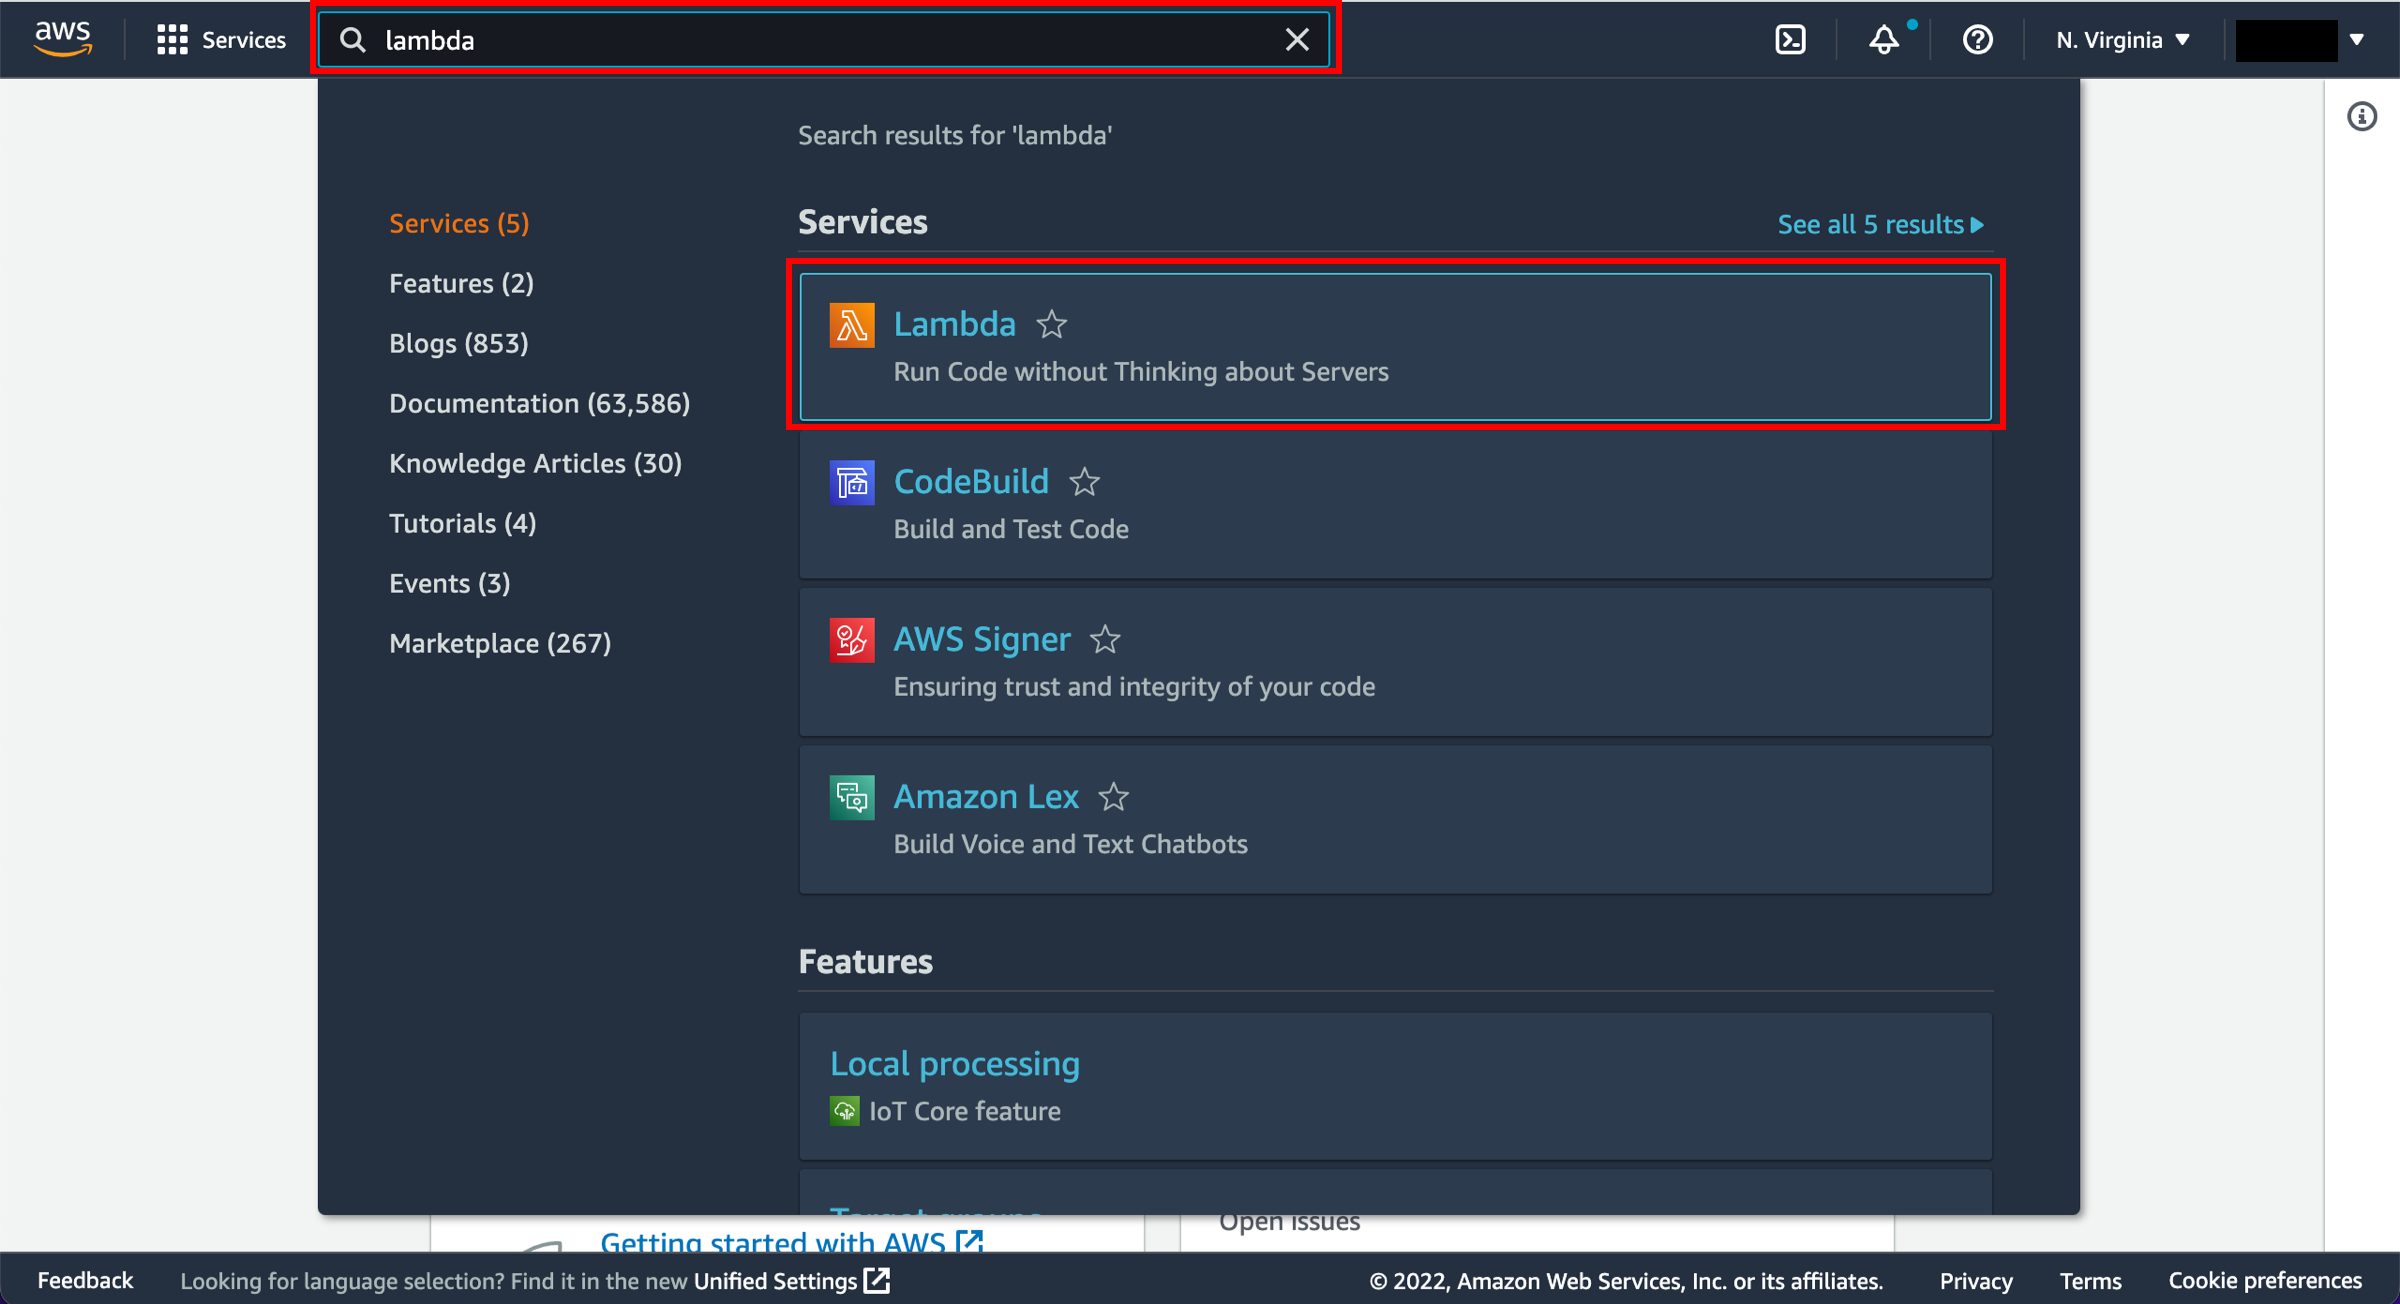
Navigate to the Lambda Console
In the top navigation bar of the AWS Management Console, search for Lambda and open the AWS Lambda Console.
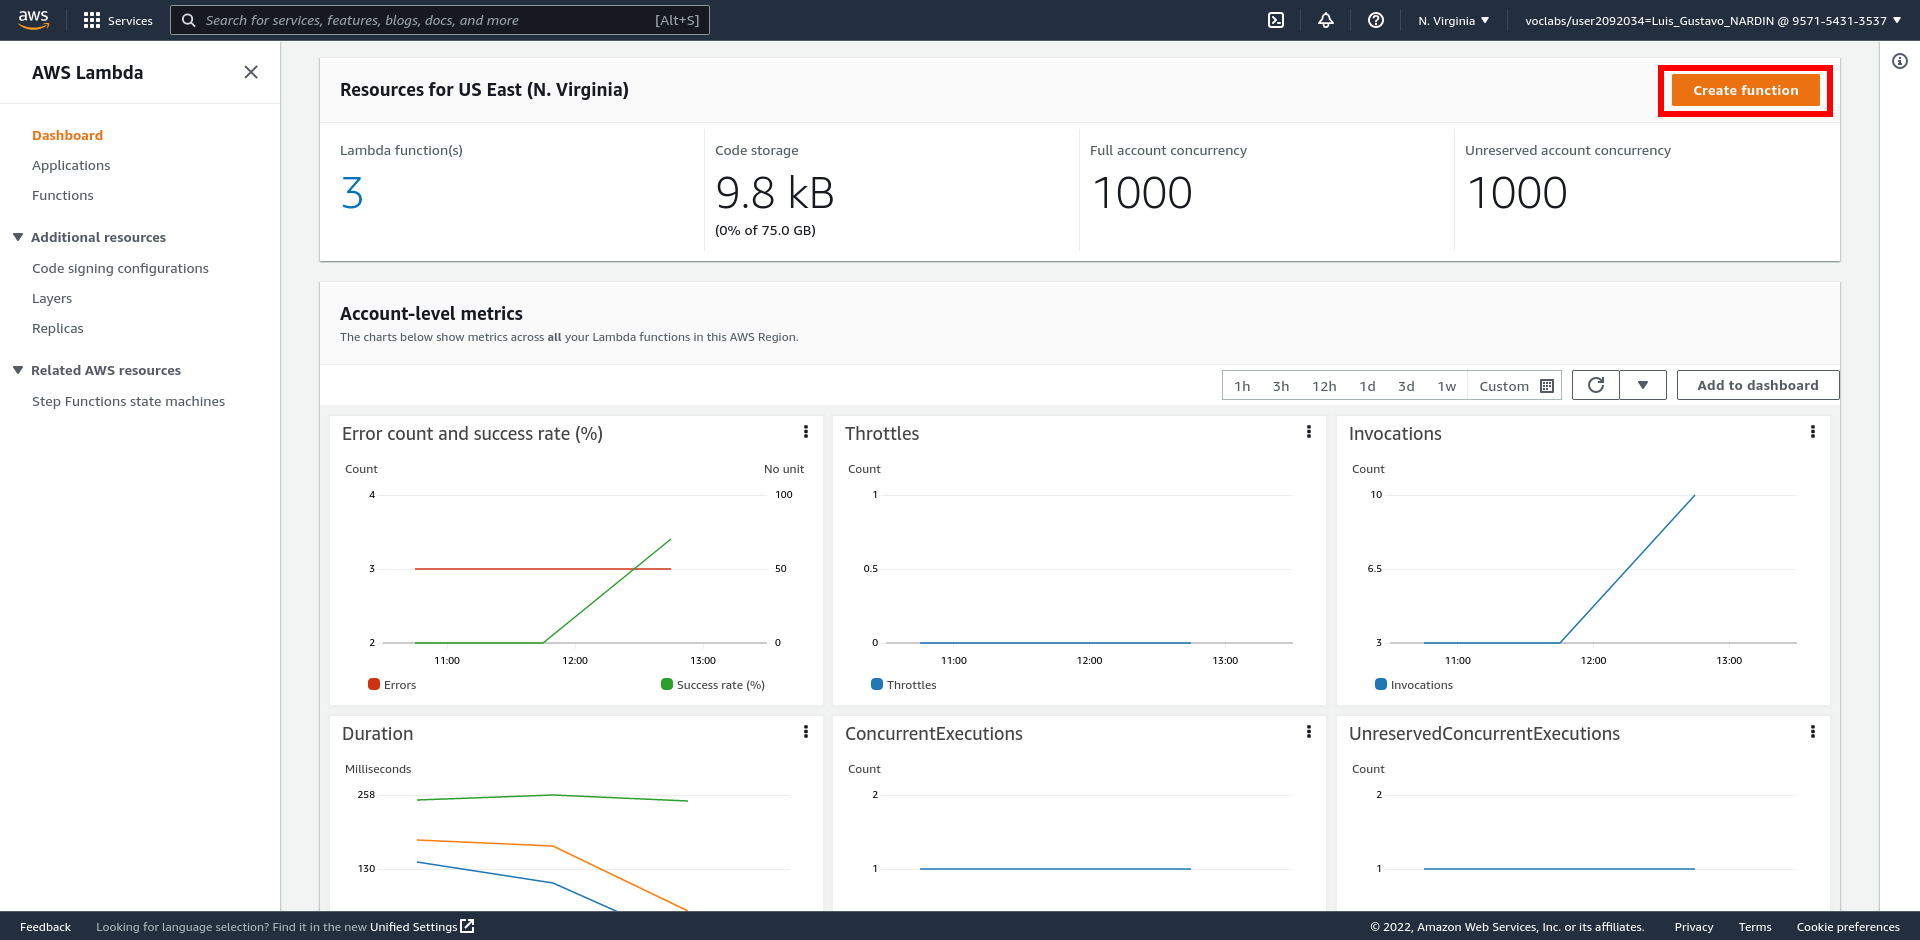
Create a Lambda Function
A Lambda function consists of code you provide, associated dependencies, and configuration. The configuration information you provide includes the compute resources you want to allocate (e.g., memory), execution timeout, and an IAM role that AWS Lambda can assume to execute your Lambda function on your behalf.
In the AWS Lambda Console, choose Create function.
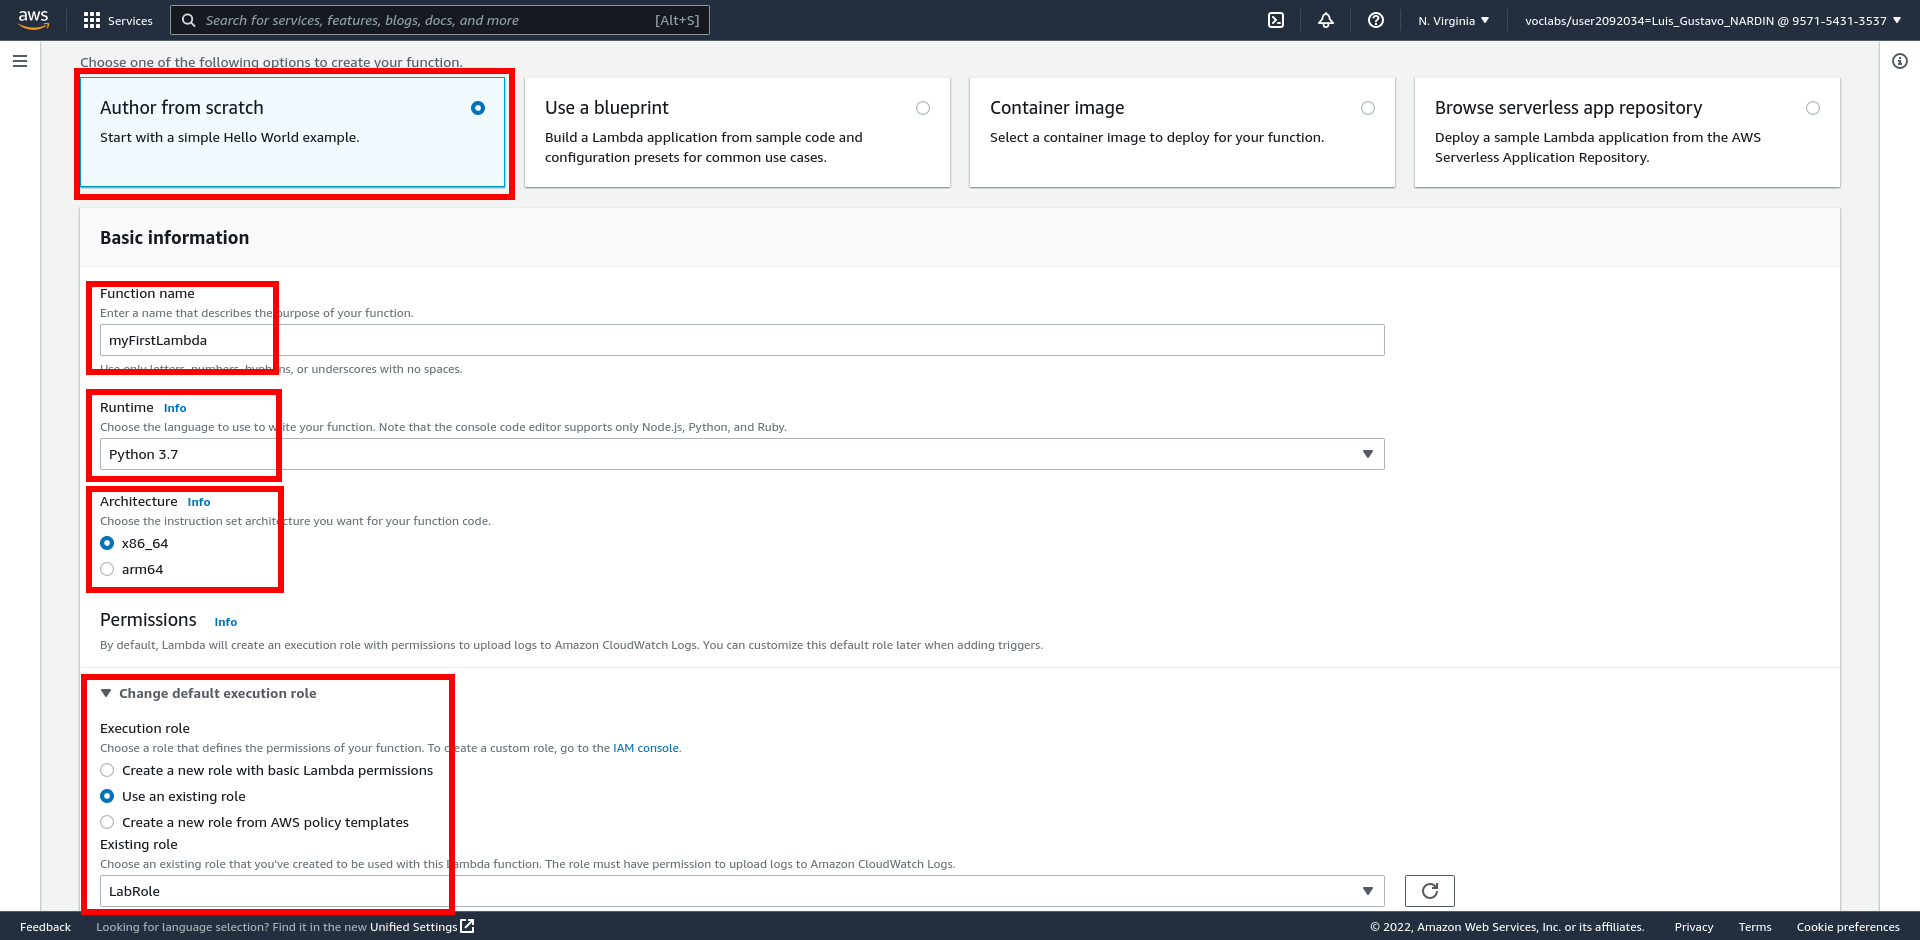
Configure the Lambda Function
-
In the Create function, select Author from scratch
-
In the Basic information, enter
-
Function name: myFirstLambda
-
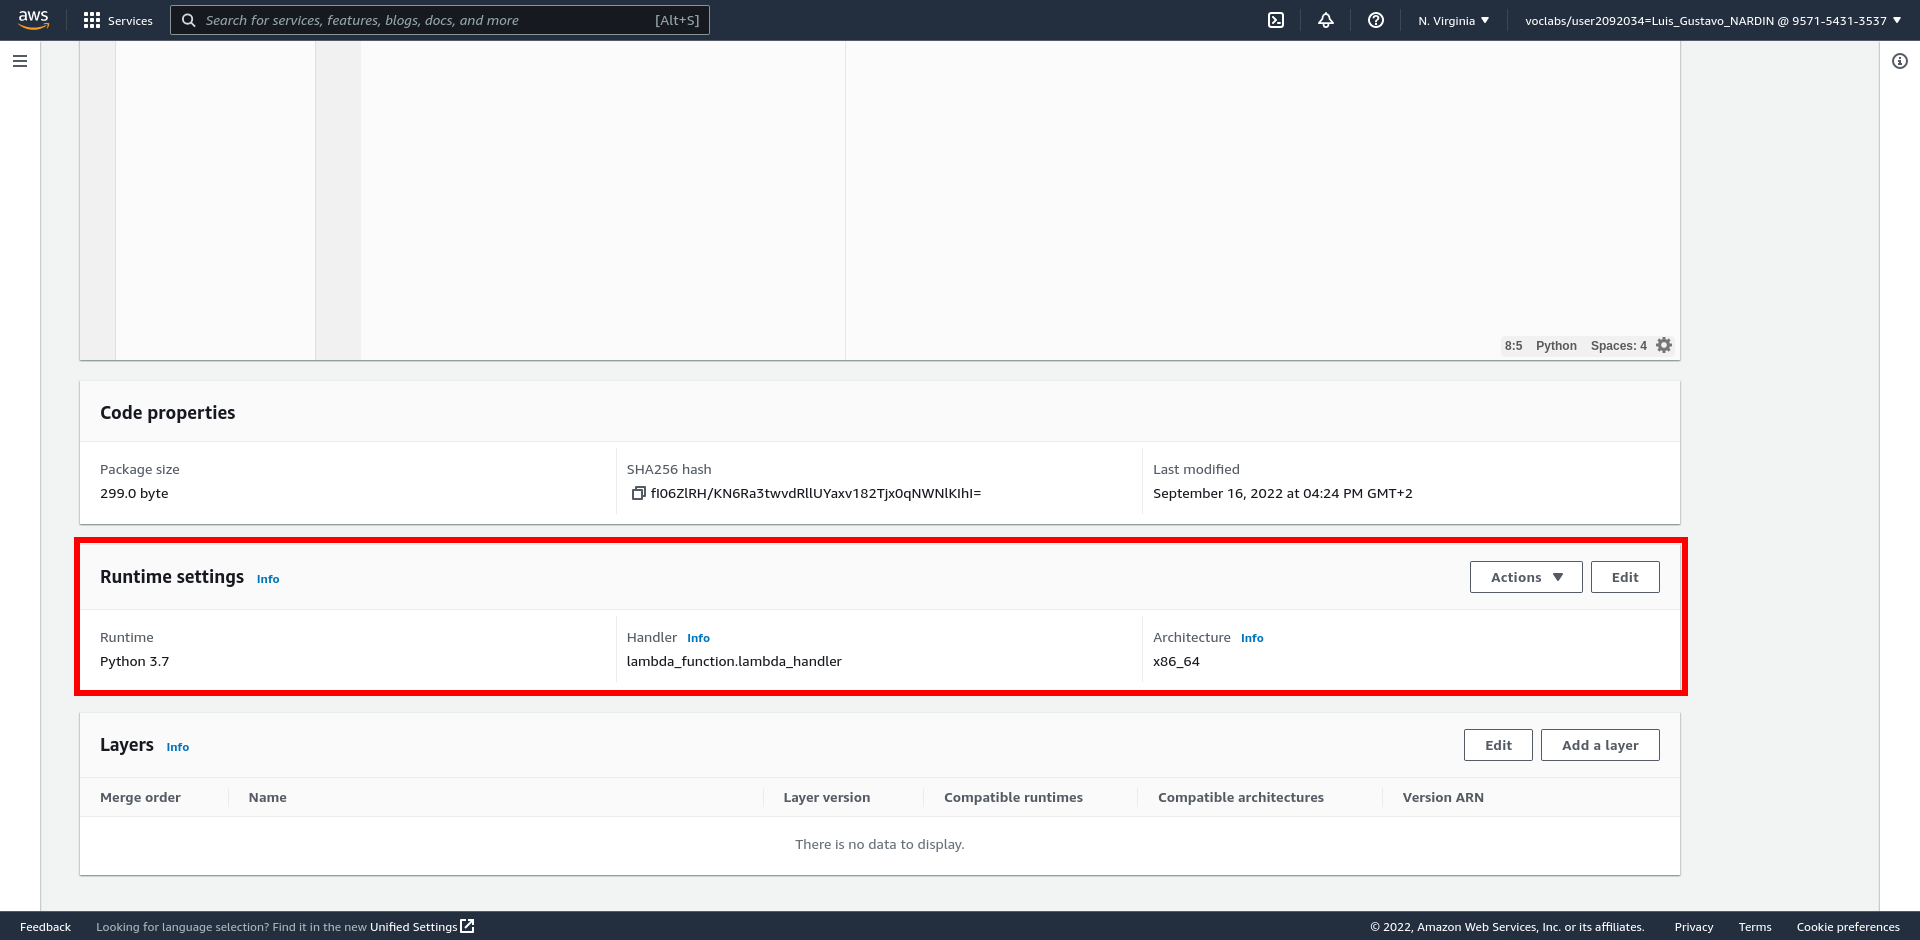
Runtime: Python 3.7
-
Architecture: x86_64
-
Expand the Change default execution mode and set
-
Execution role: Use the existing role
-
Existing role: LabRole
-
-
-
Select the Create function button
Change the Source Code
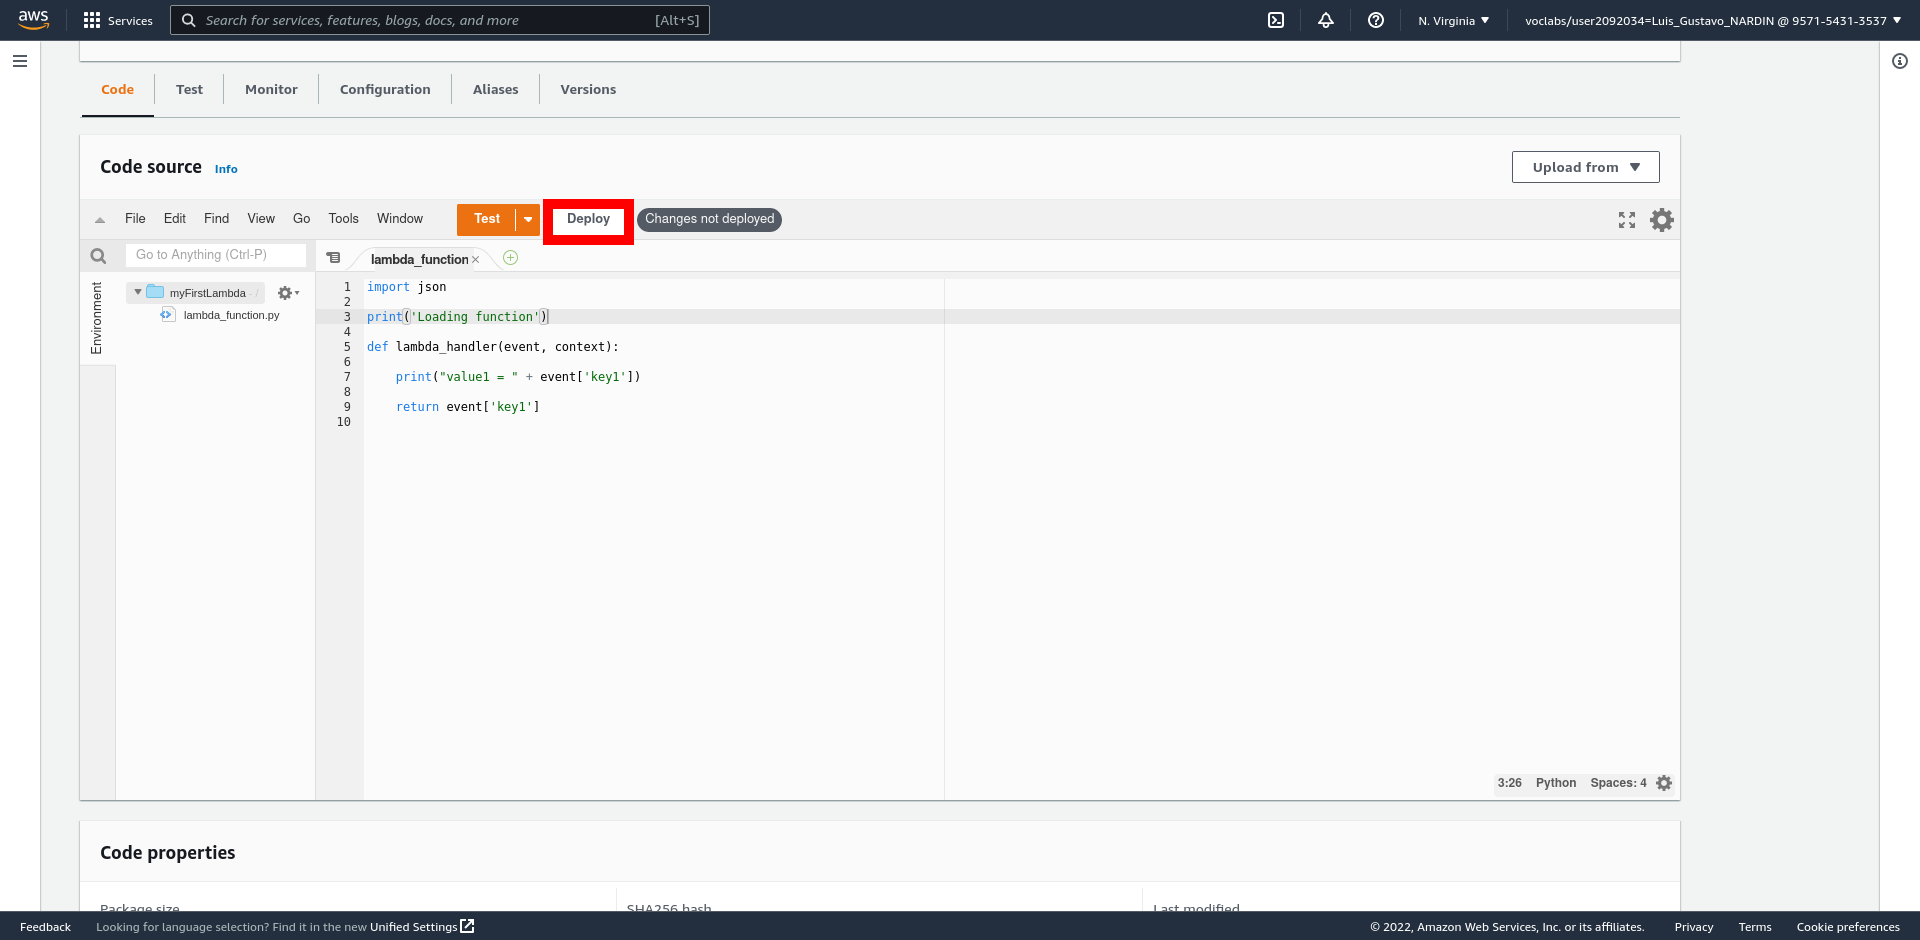
Replace the content in the lambda_function tab by
import json

print('Loading function')

def lambda_handler(event, context):

    print("value1 = " + event['key1'])

    return event['key1']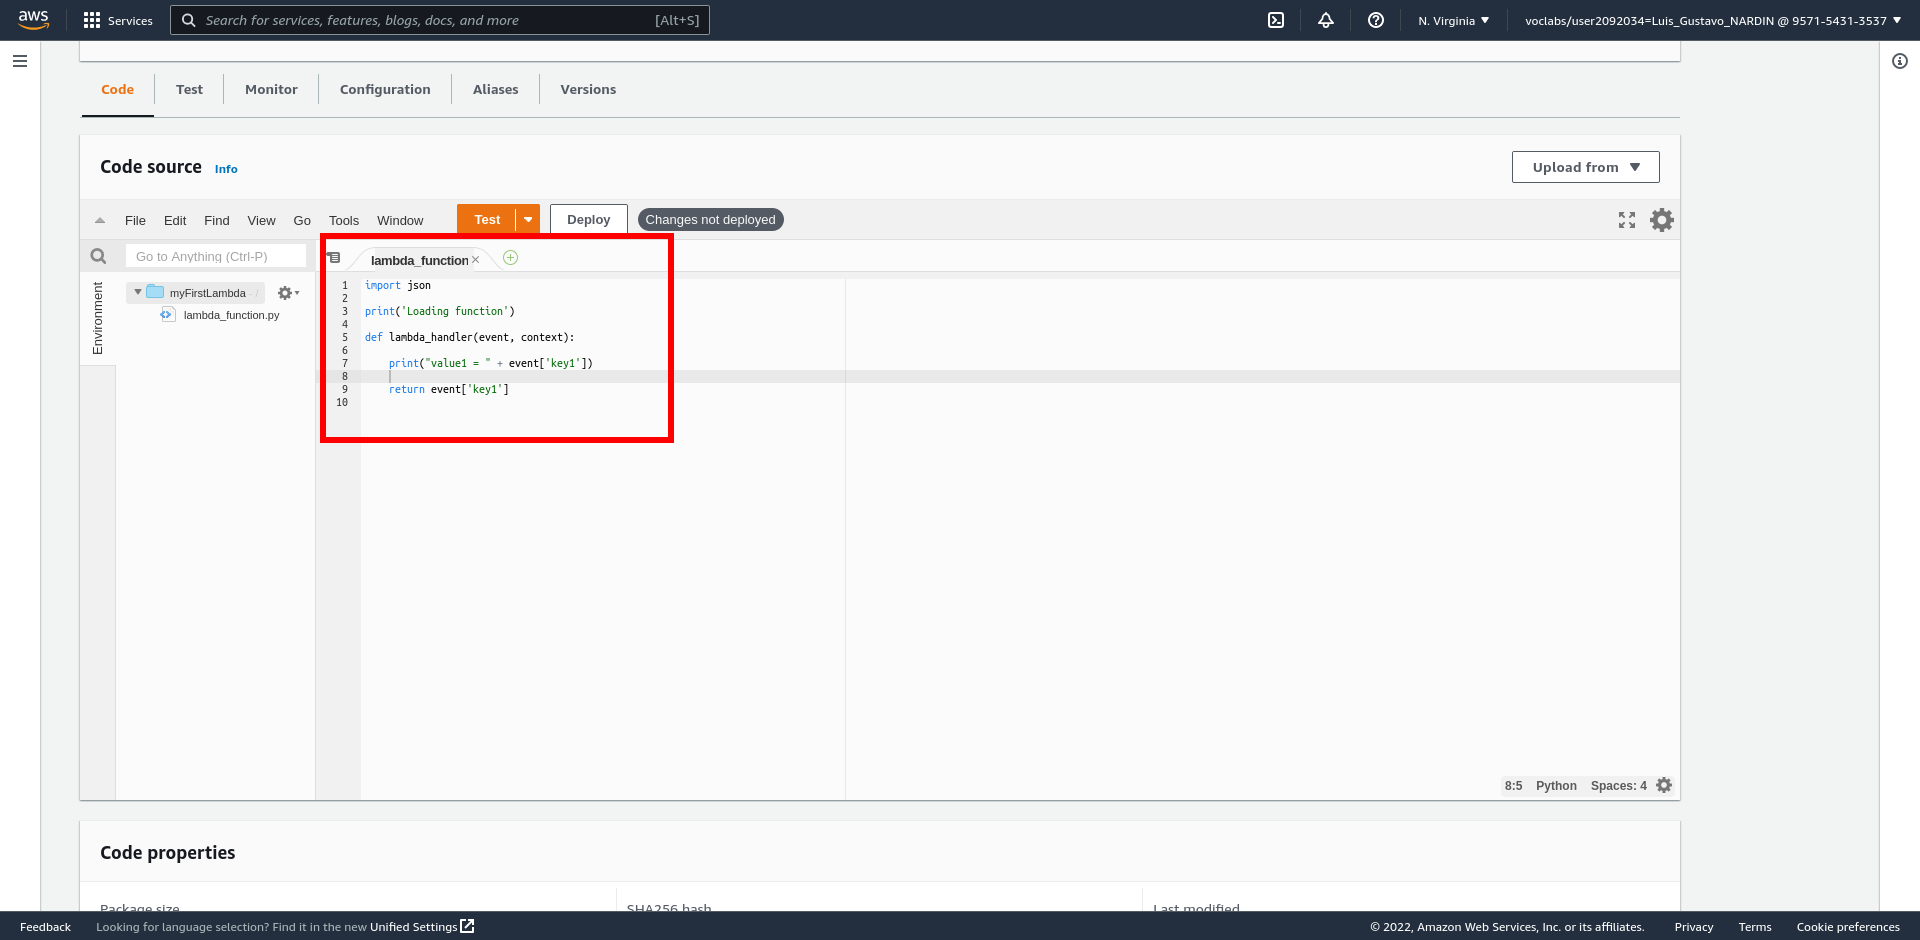
Select the Deploy button to deploy the changes.
The function defined in the Python code is set as the Handler in the Runtime settings. You can change the file or function name, but then you have to edit this field in the Lambda configuration.
Invoke Lambda Function
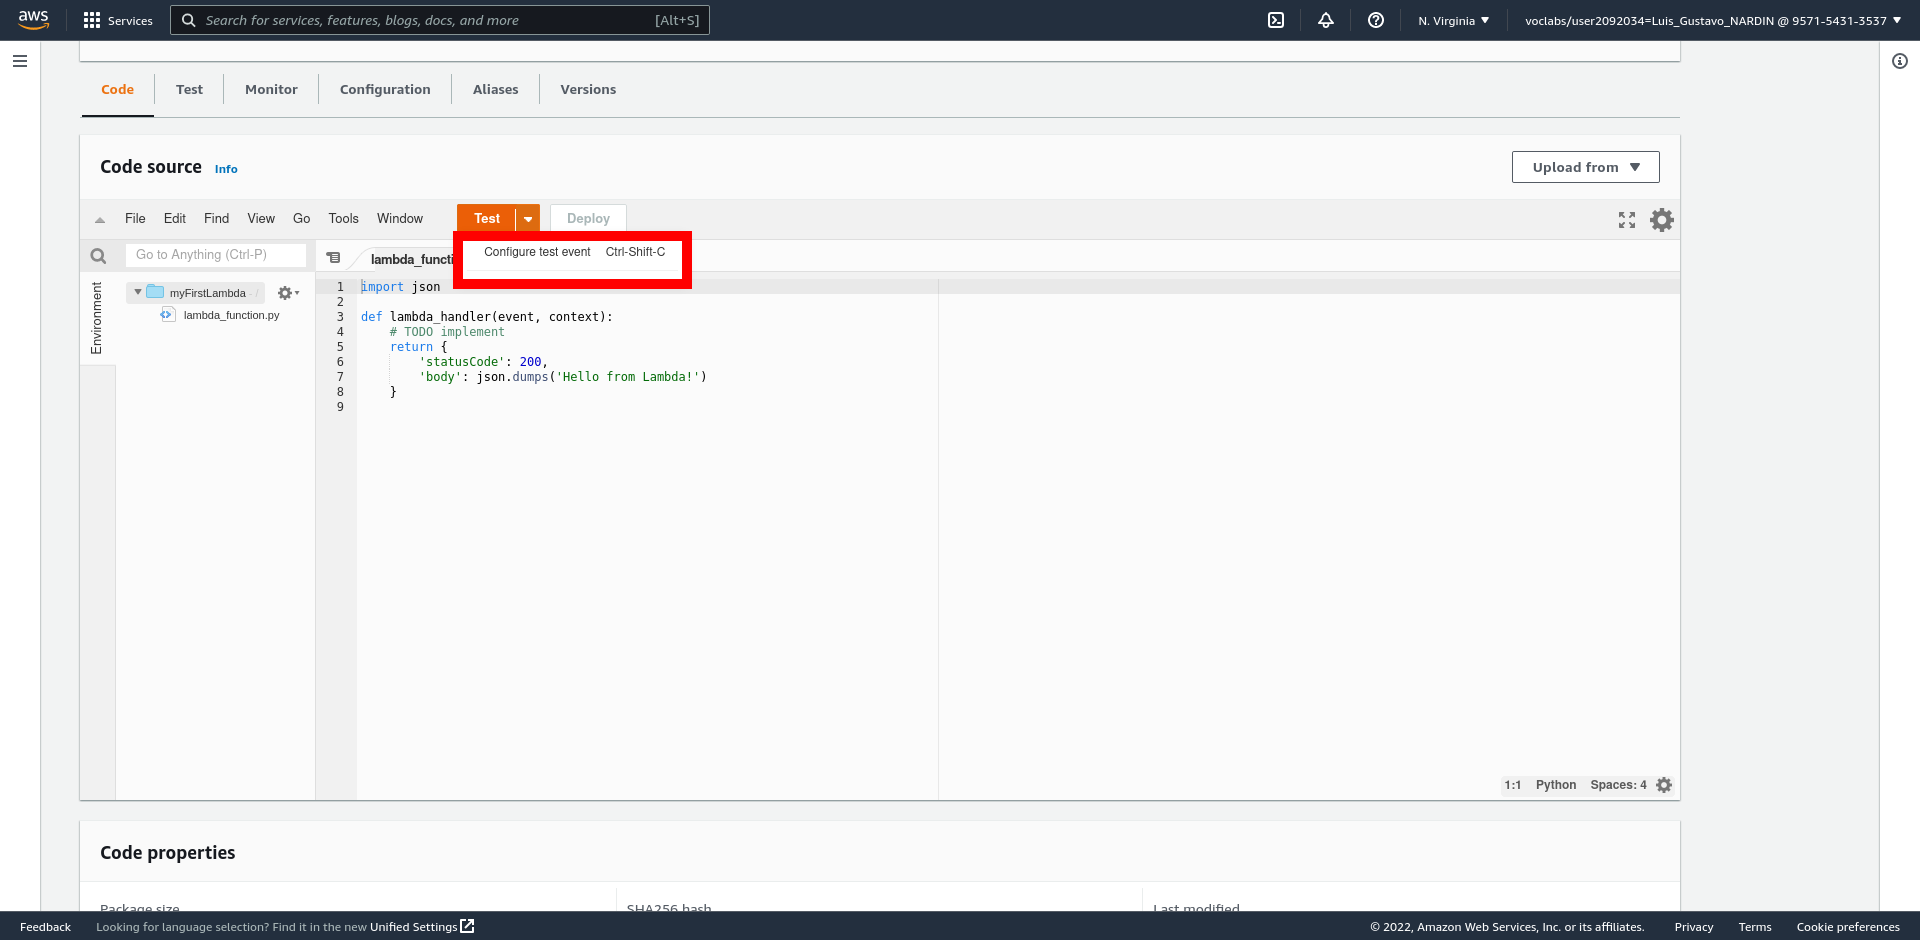
The console shows the myFirstLambda Lambda function. Let’s test the function, verify results, and review the logs.
-
Select Configure Test Event from the drop-down menu called Test
-
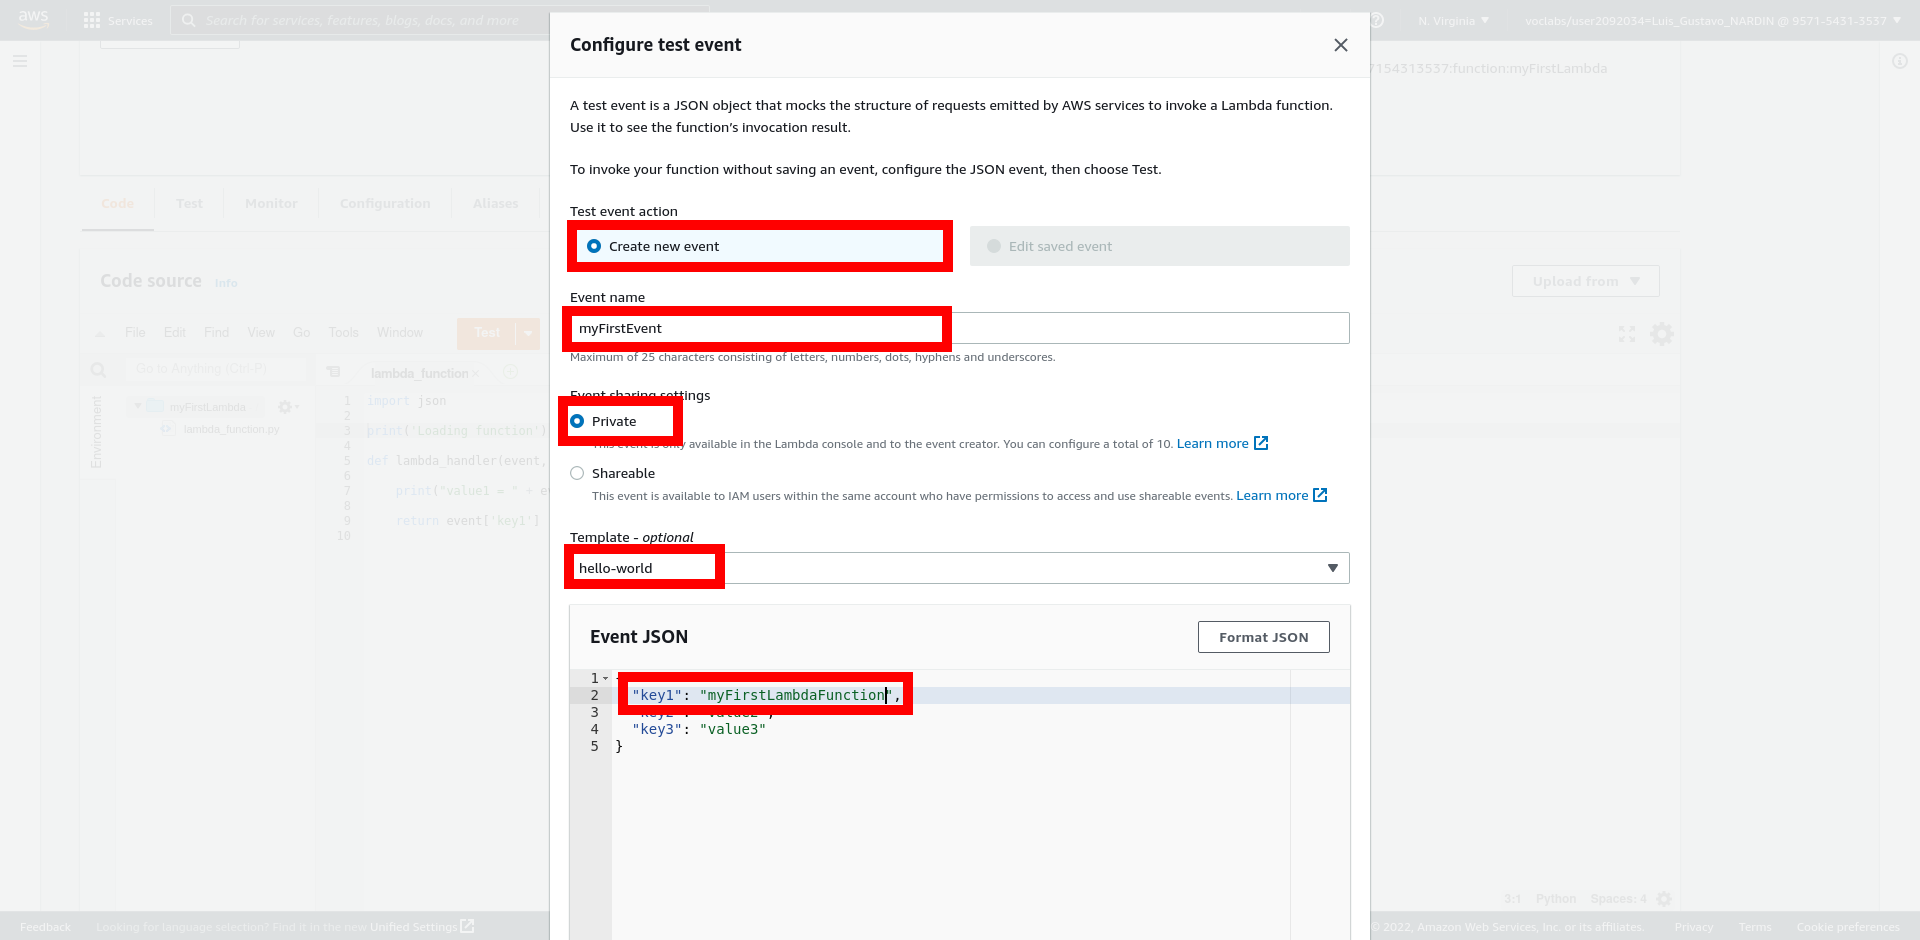
Enter an event to test the function
-
Select Create new event
-
Event name: myFirstEvent
-
Retain the default setting of Private for Event sharing settings
-
Choose hello-world from the template list
-
Change the values in the sample JSON, but do not change the event structure. For this tutorial, replace value1 with myFirstLambda
-
Select Save
-
-
Select Test
-
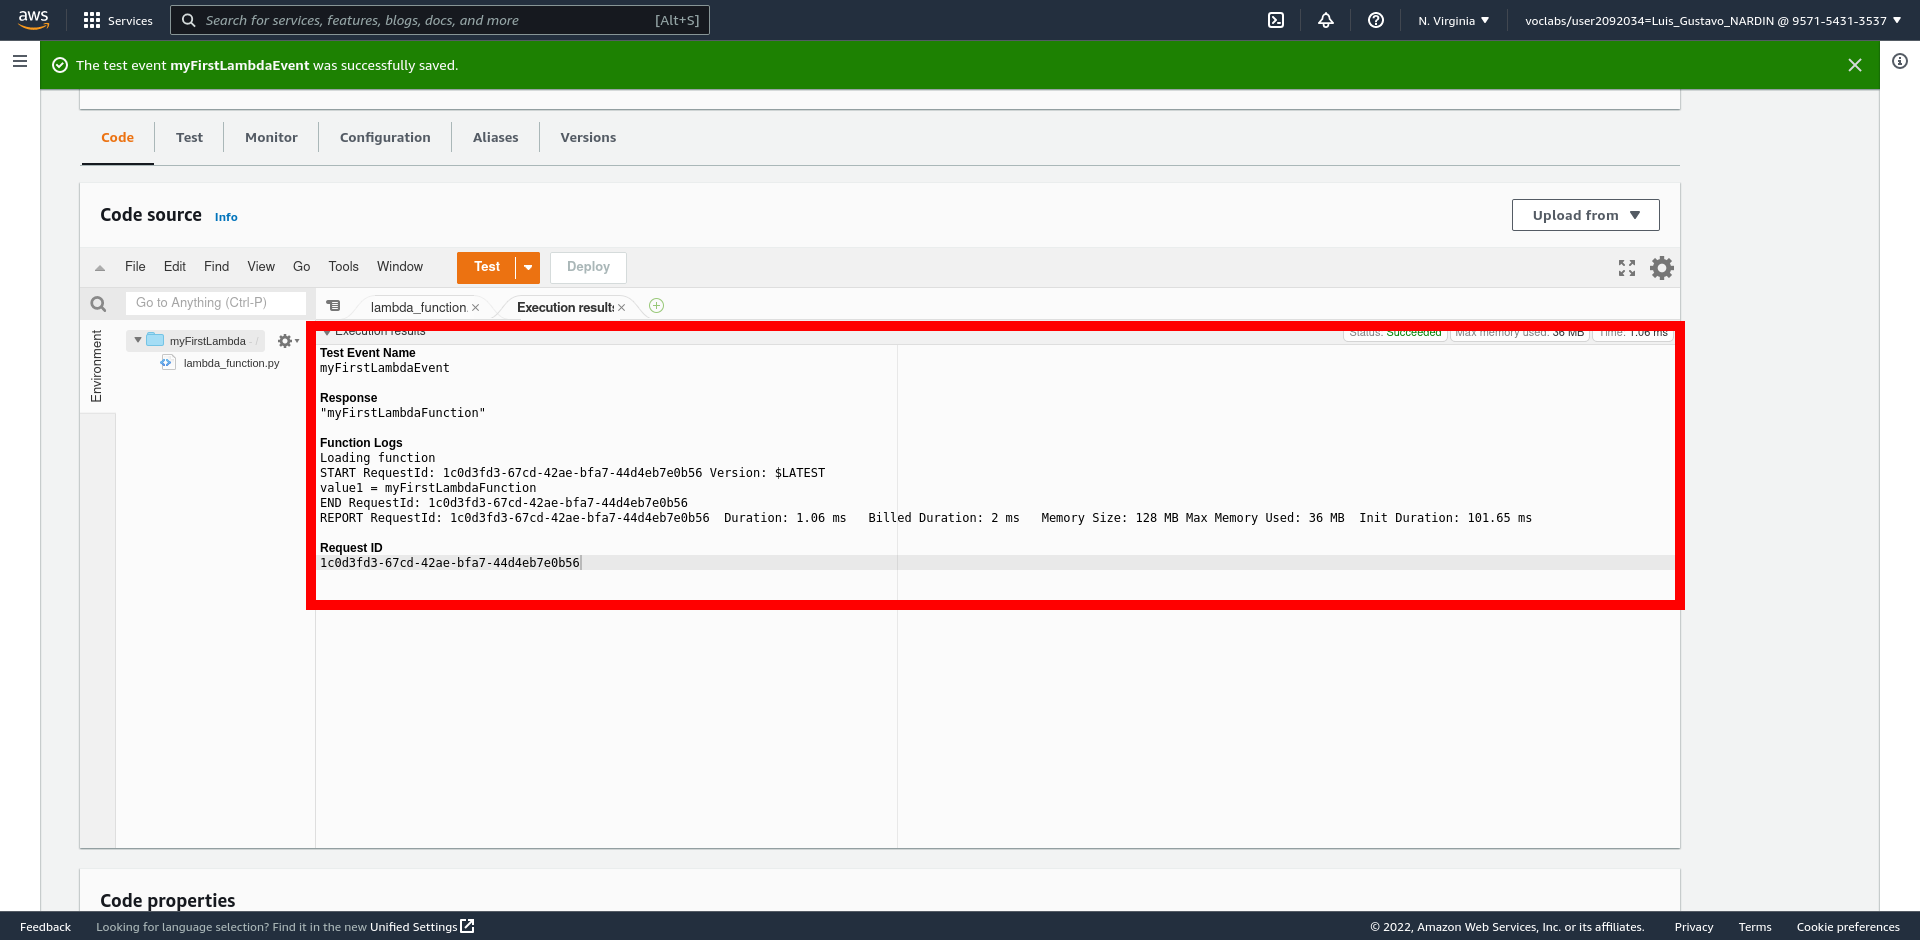
Upon successful execution, view the results in the console
-
The Execution results tab verifies that the execution succeeded
-
The Function Logs section will show the logs generated by the Lambda function execution as well as key information reported in the Log output.
-
Monitor Metrics
AWS Lambda automatically monitors Lambda functions and reports metrics through Amazon CloudWatch. AWS Lambda automatically tracks the number of requests, the latency per request, and the number of requests resulting in an error and publishes the associated metrics.
-
Invoke the Lambda function a few more times by repeatedly choosing the Test button. This will generate the metrics that can be viewed in the next step.
-
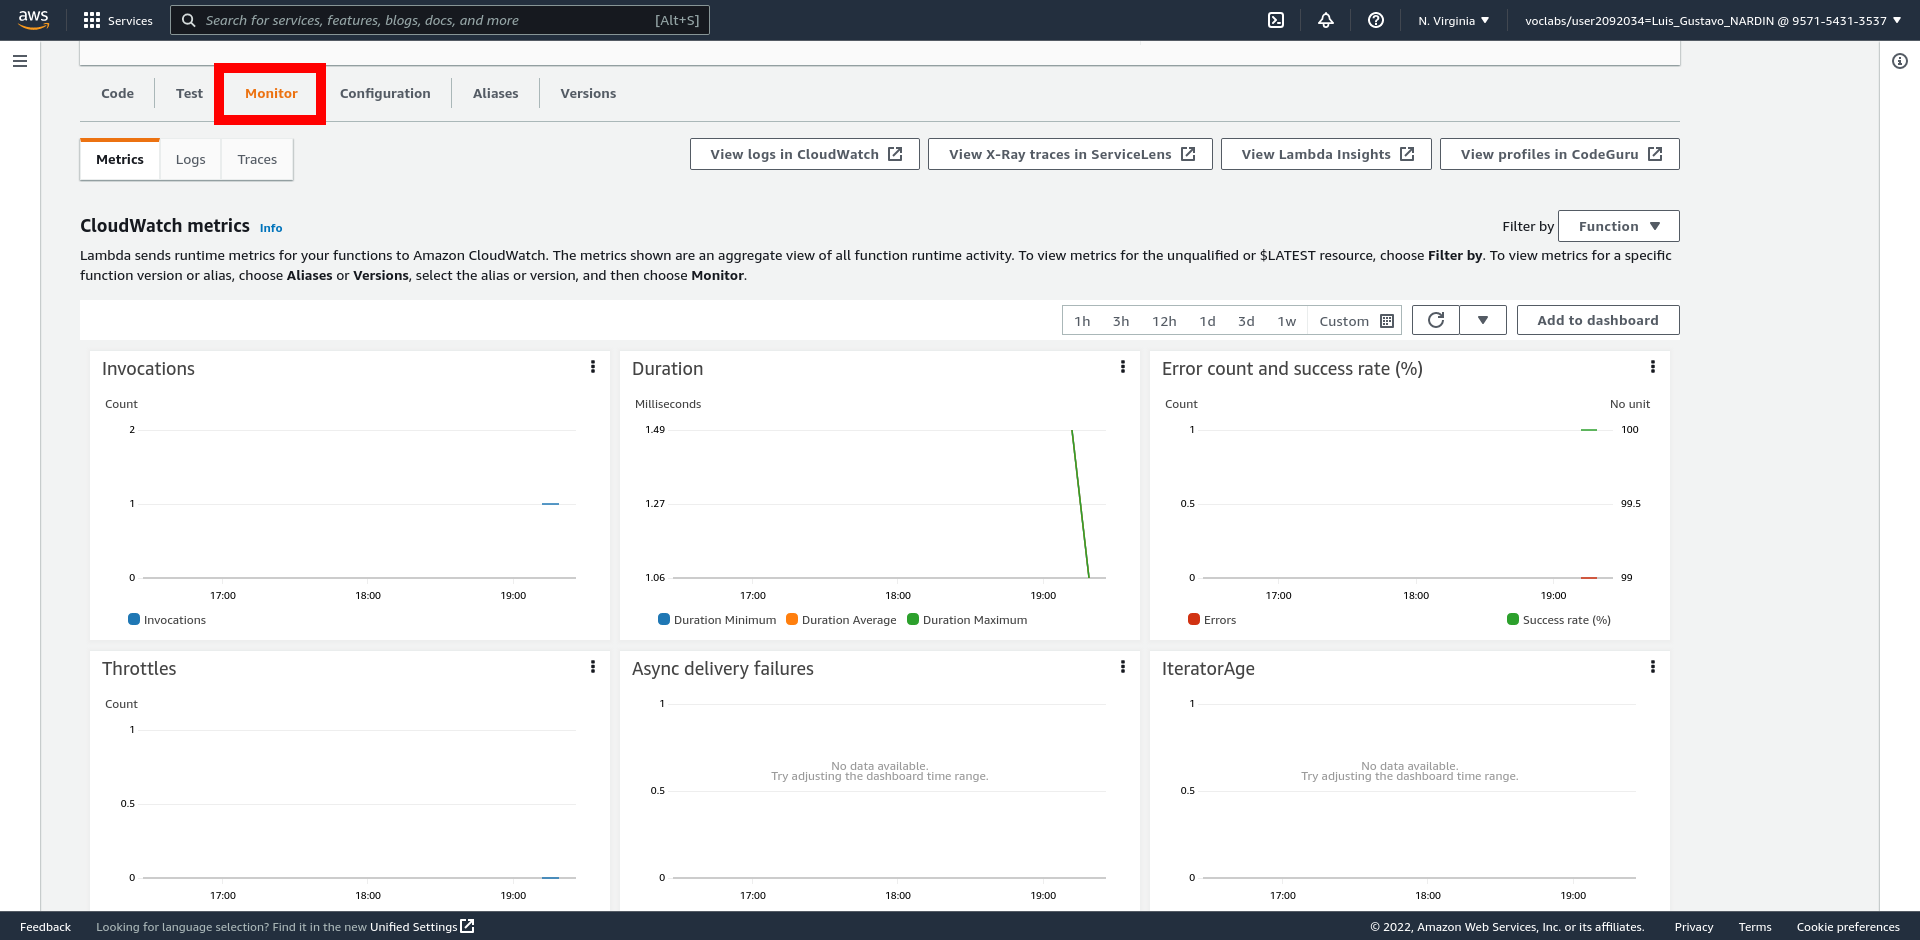
Select the Monitor tab to view the results
-
Scroll down to view the metrics for your Lambda function. Lambda metrics are reported through Amazon CloudWatch.
The Monitoring tab will show seven CloudWatch metrics: Invocations, Duration, Error count and success rate (%), Throttles, Async delivery failures, IteratorAge, and Concurrent executions.
AWS Lambda with Java
In this section, you will learn how to create AWS Lambda functions with Java.
|
Note
|
It is assumed that you already have an AWS Java project set up. If not, refer to Create AWS Java Project. |
There are five basic steps to creating AWS Lambda functions that run Java:
-
Import Package Dependency
-
Write Java Code
-
Package Code
-
Create Lambda Function
-
Deploy Package
-
Run the AWS Lambda
Import Package Dependency
Confirm that you have the entry in the POM file in between the <dependencies> and the </dependencies> tags to the POM file in order to import the AWS Lambda dependency. This package defines the types required for AWS Lambda to call the Java function.
<dependency>
  <groupId>com.amazonaws</groupId>
  <artifactId>aws-lambda-java-core</artifactId>
  <version>1.2.3</version>
</dependency>
Write Java Code
Now you should write the Java code specifying what the Lambda function will do. The minimum structure for a Lambda class code in Java has the structure.
|
Note
|
Create this file under the src/main/java/fr/emse/lambda folder
|
package fr.emse.lambda;

import com.amazonaws.services.lambda.runtime.Context;
import com.amazonaws.services.lambda.runtime.RequestHandler;

public class MyLambdaFunction implements RequestHandler<String, String> {

  public String handleRequest(String arg, Context context) {
    return arg;
  }
}
The parameter arg is the data passed as arguments to the function. The parameter context contains the execution information, such as, the function name and version.
-
Create the package structure as in the code above
-
Create a new class called MyLambdaFunction
-
Copy and paste the code snippet above
-
Save the file with the name MyLambdaFunction.java
Package Code
To deploy the code on AWS Lambda, you need to package it in a jar file. To generate the jar file, enter the command in a terminal in the root directory of your project.
mvn packageThe jar file is generated and placed inside the target folder. The name of the file should be similar to aws-cloud-1.0-SNAPSHOT.jar.
Create Lambda Function
Open the Lambda Management Console (see Navigate to the Lambda Console) and select the Create Function button.
-
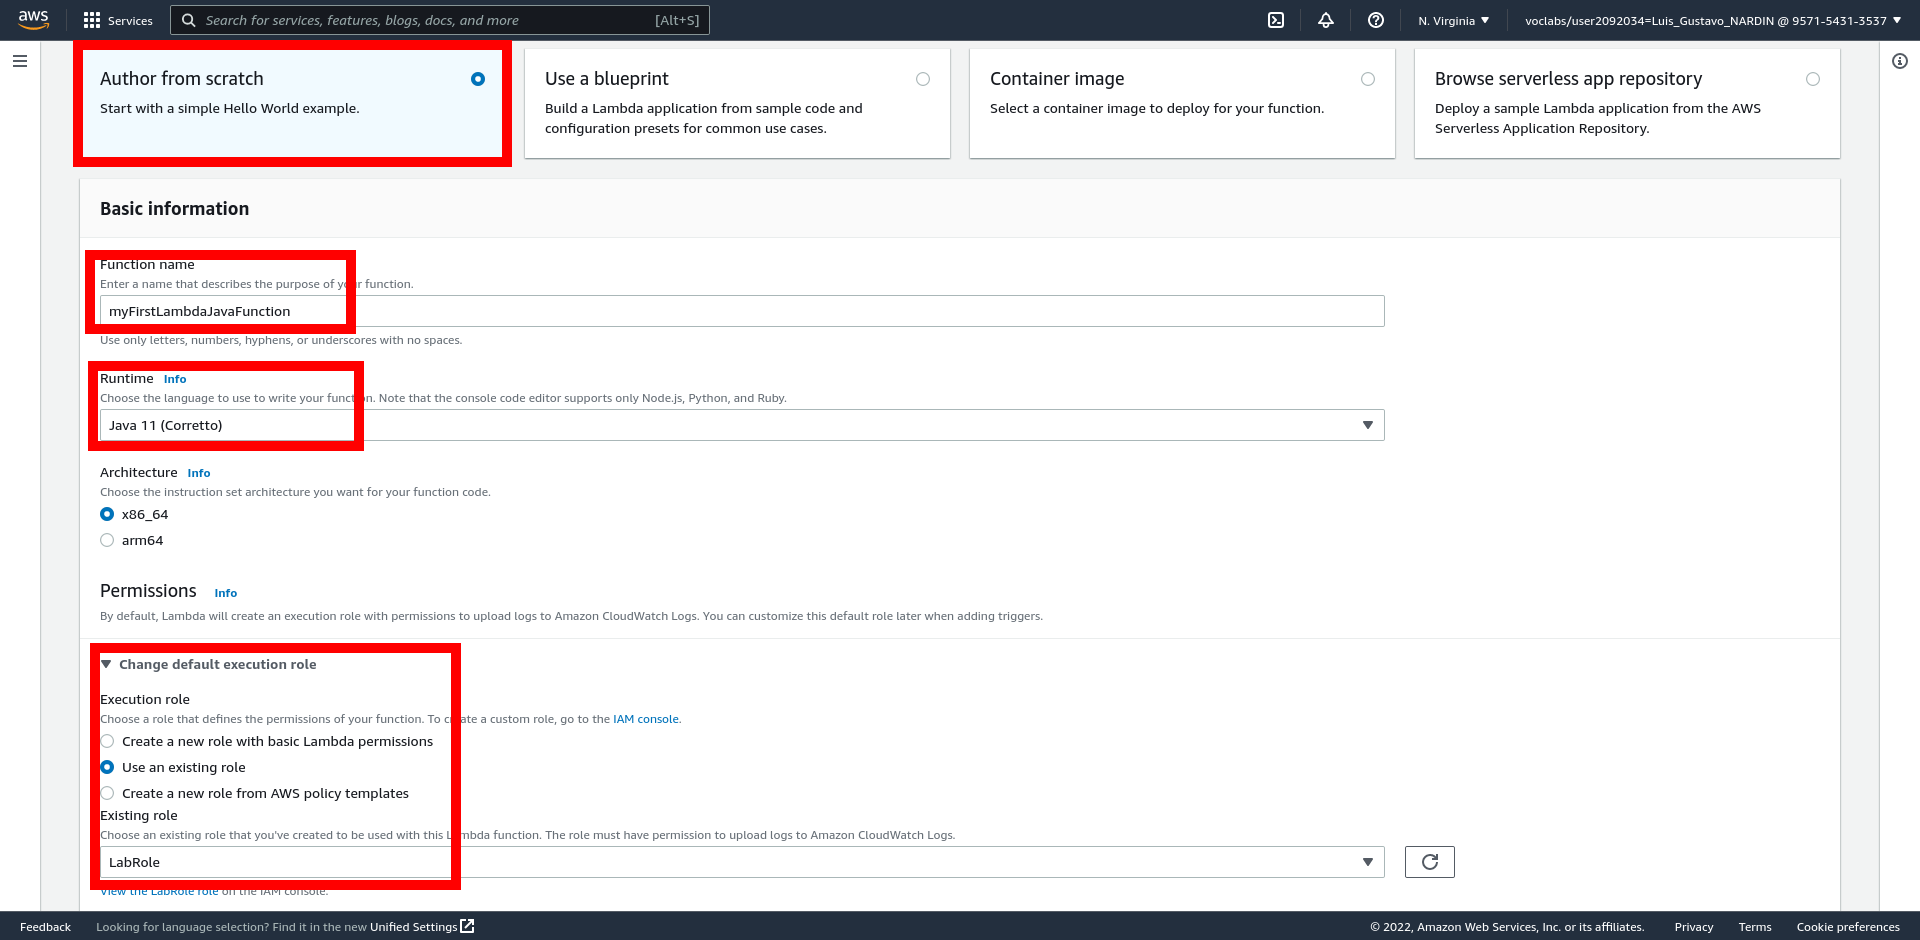
Select Author from scratch
-
Function name: myFirstLambdaJavaFunction
-
Runtime: Java 11 (Corretto)
-
Architecture: x86_64
-
Expand the Change default execution mode and set
-
Execution role: Use the existing role
-
Existing role: LabRole
-
-
-
Select the Create function button
Deploy Package
To deploy the code
-
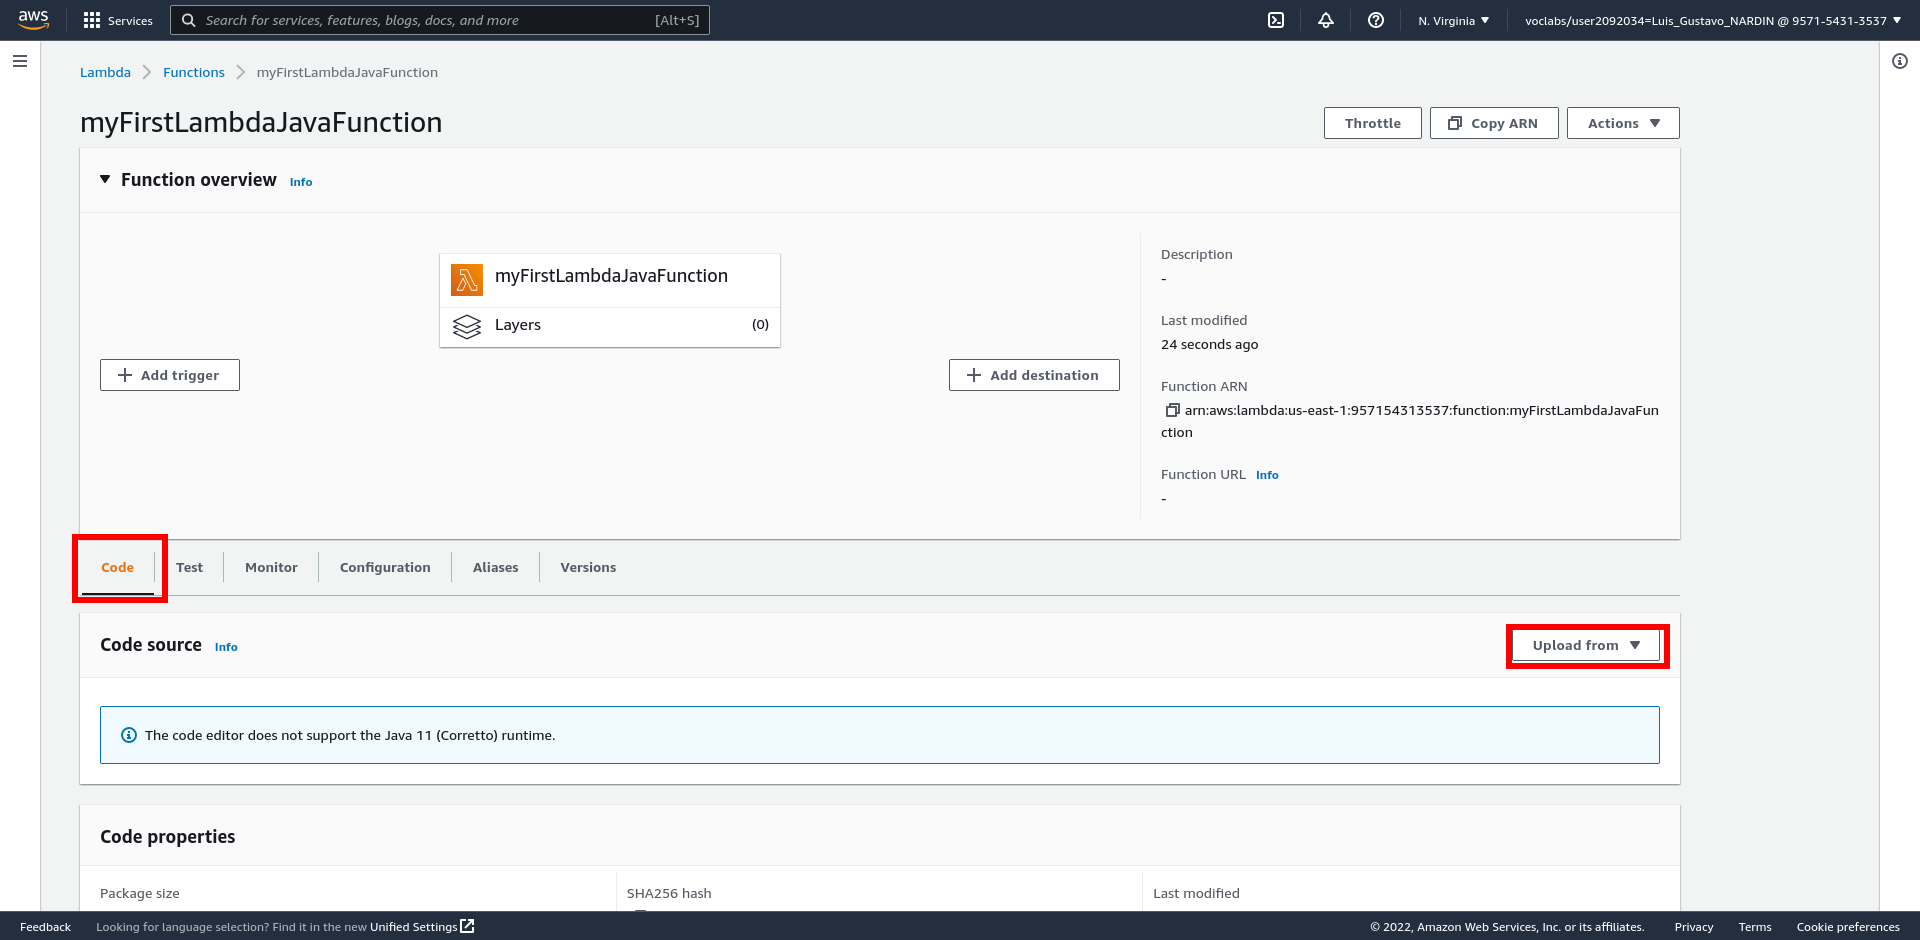
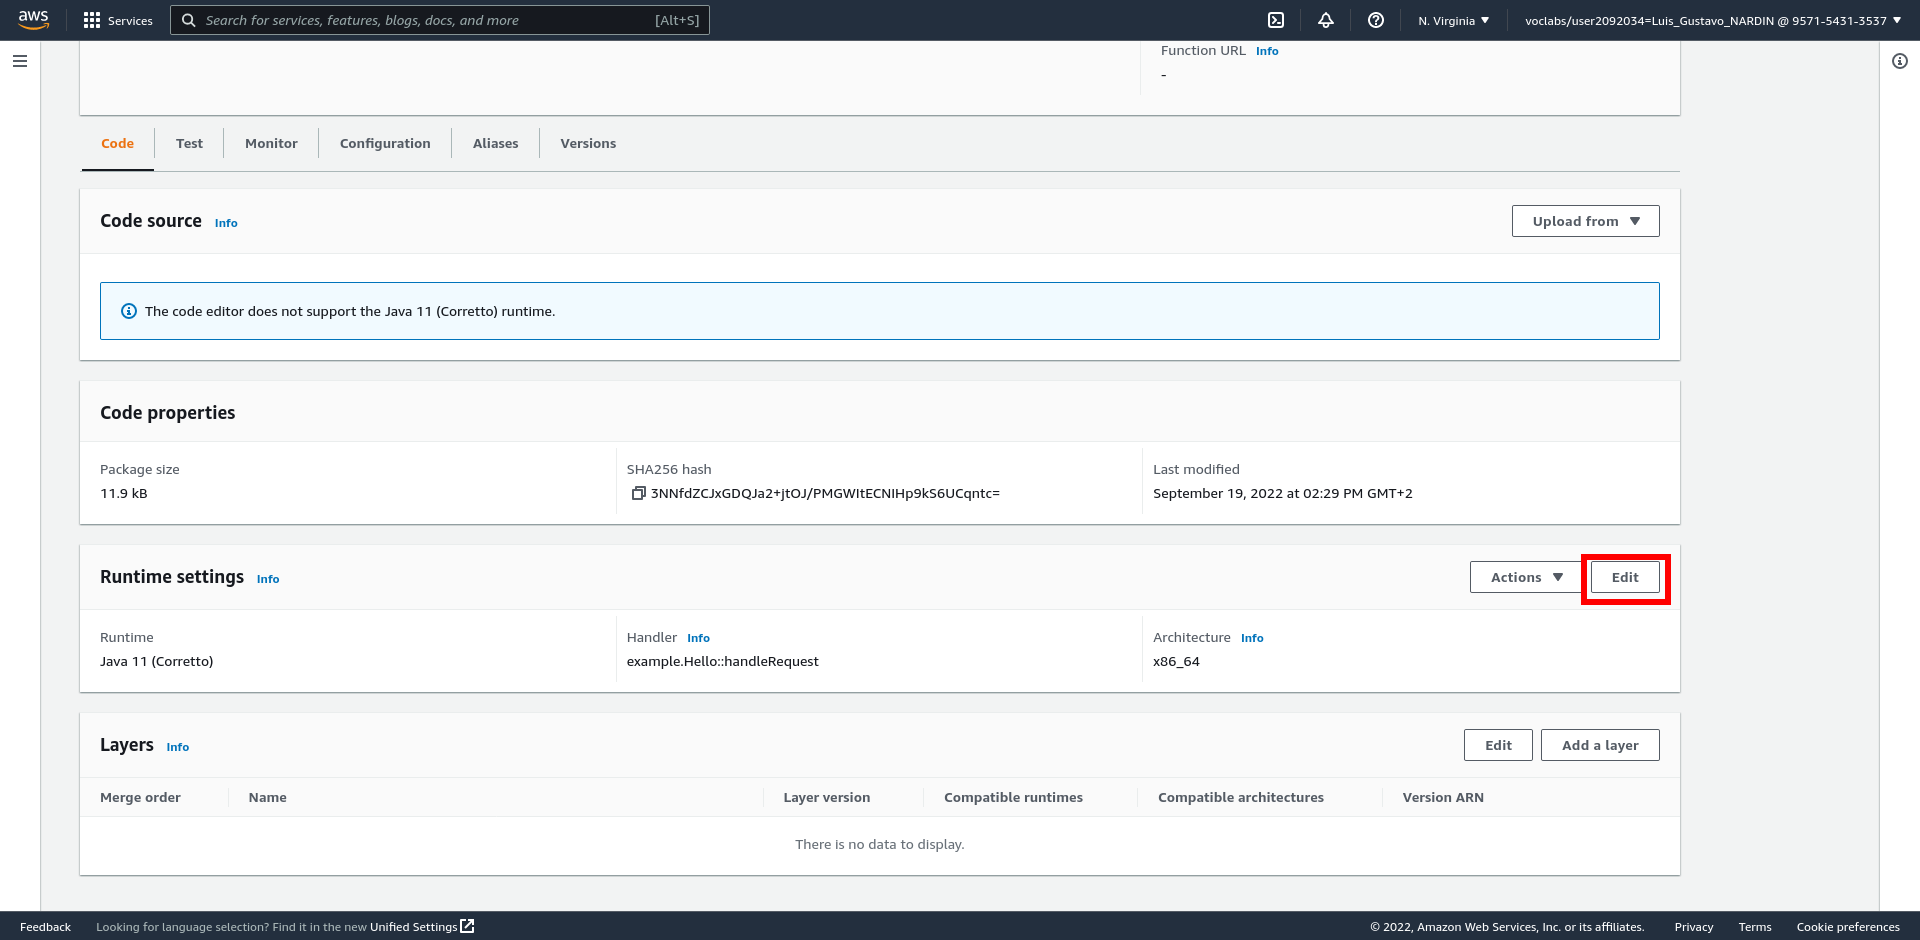
Select the Code tab
-
Select the Upload from → .zip or .jar file → Upload button
-
Select the
jarfile you have generated in the step Package Code -
Select the Select button
-
Select the Save button
-
-
In the Runtime settings panel, select the Edit button
-
Replace the content in the Handler field by fr.emse.lambda.MyLambdaFunction::handleRequest
This indicates to the AWS Lambda Function that once triggered, the method to be execute is
handleRequestin thefr.emse.lambda.MyLambdaFunctionclass.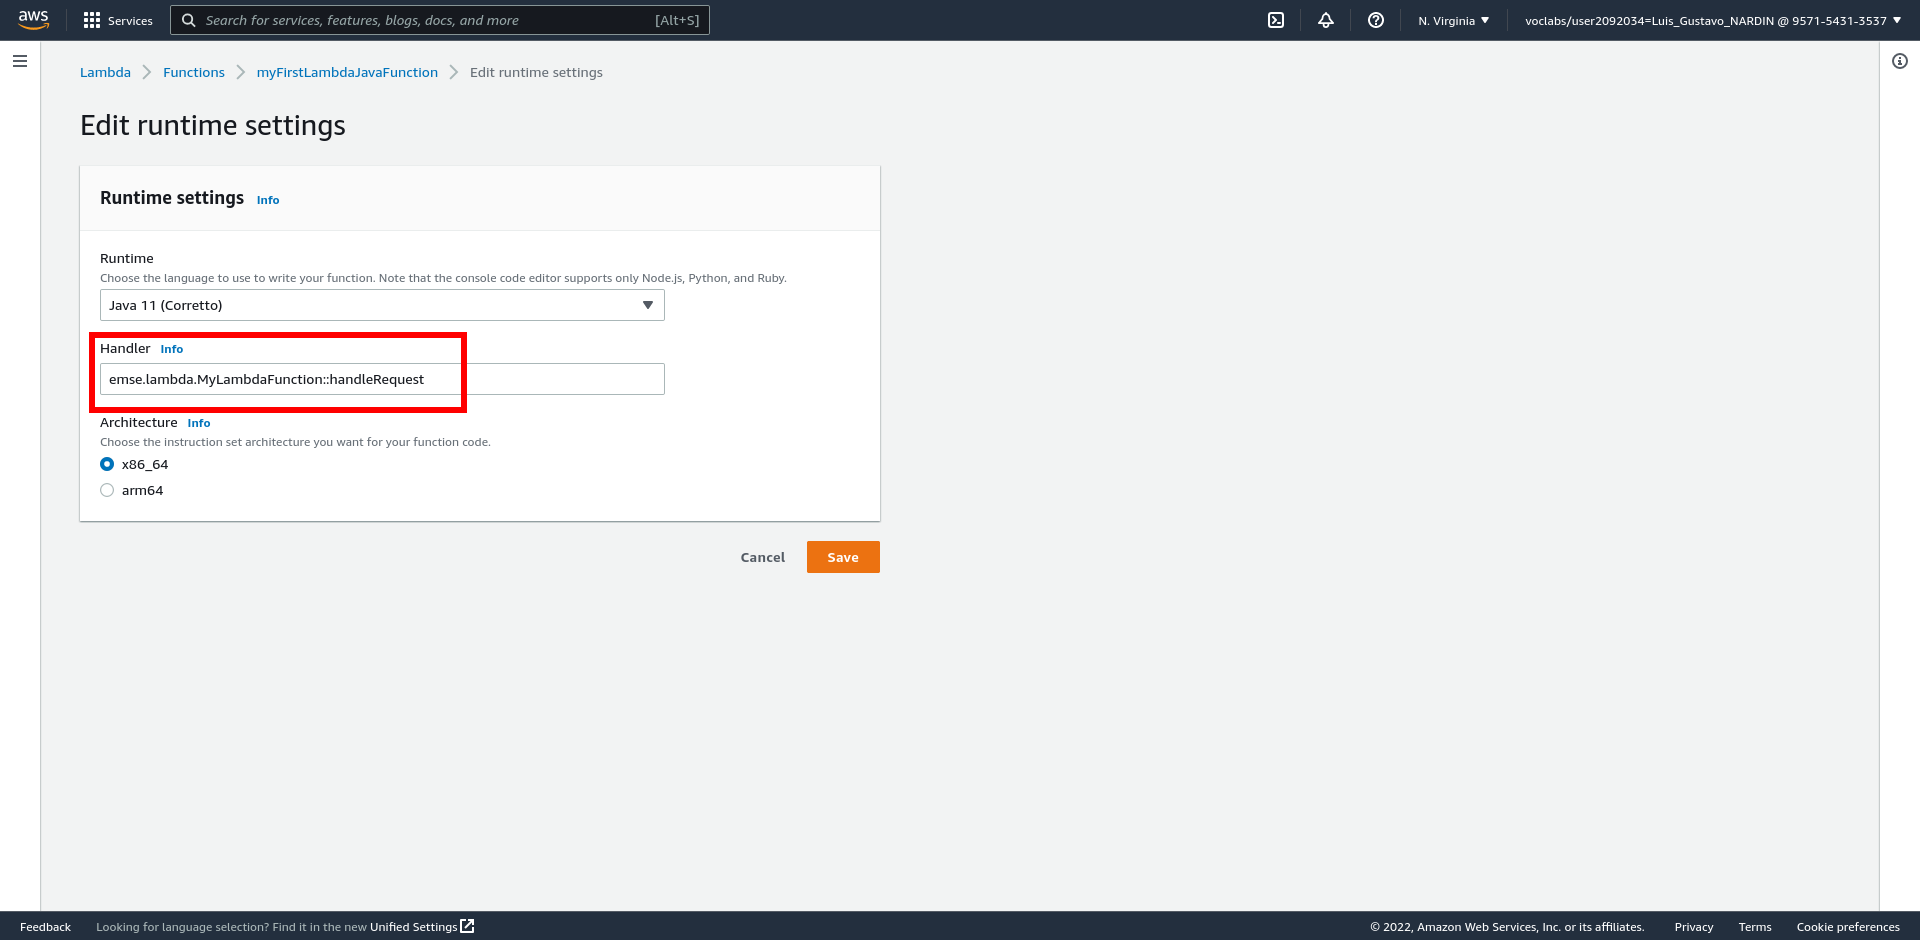
Run the AWS Lambda
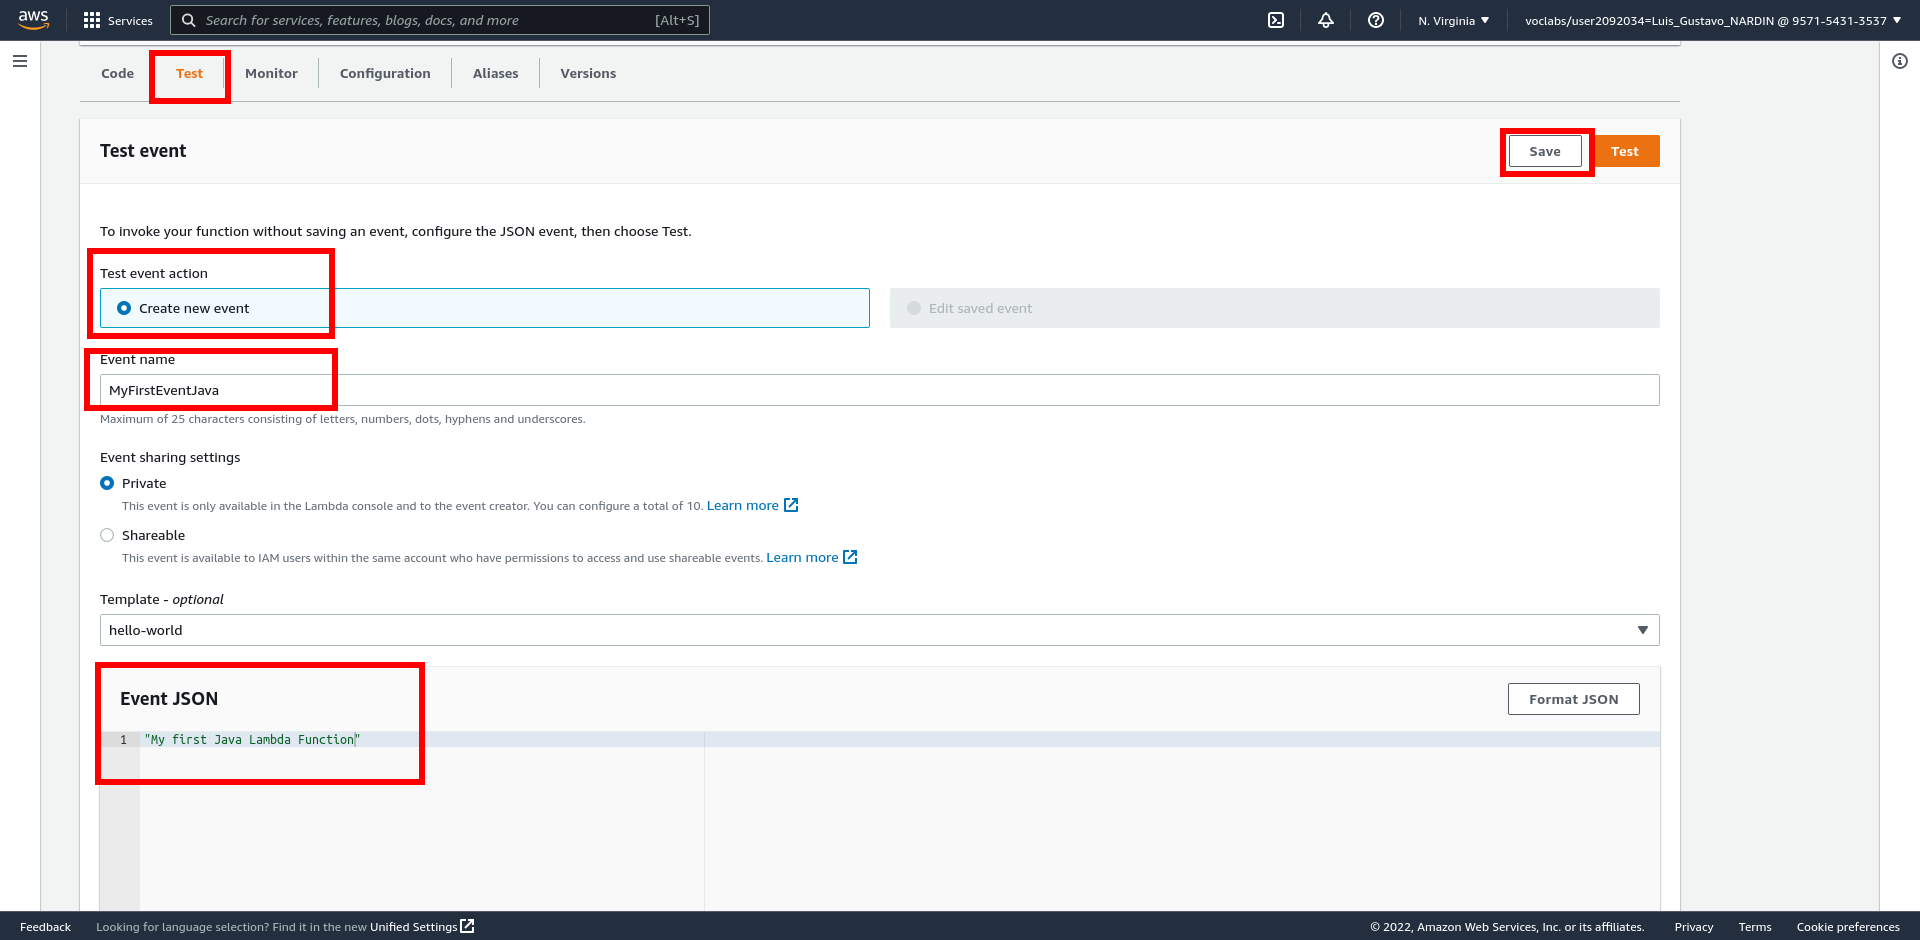
To check if the code runs as a Lambda Function, create test event.
-
Select the Test tab
-
Select Create new event
-
Set Event name: MyFirstEventJava
-
Replace the content in Event JSON by
"My first Java Lambda Function" -
Select the Save button
After saving, select the Test button and expand the Details. The output should be similar to as below.
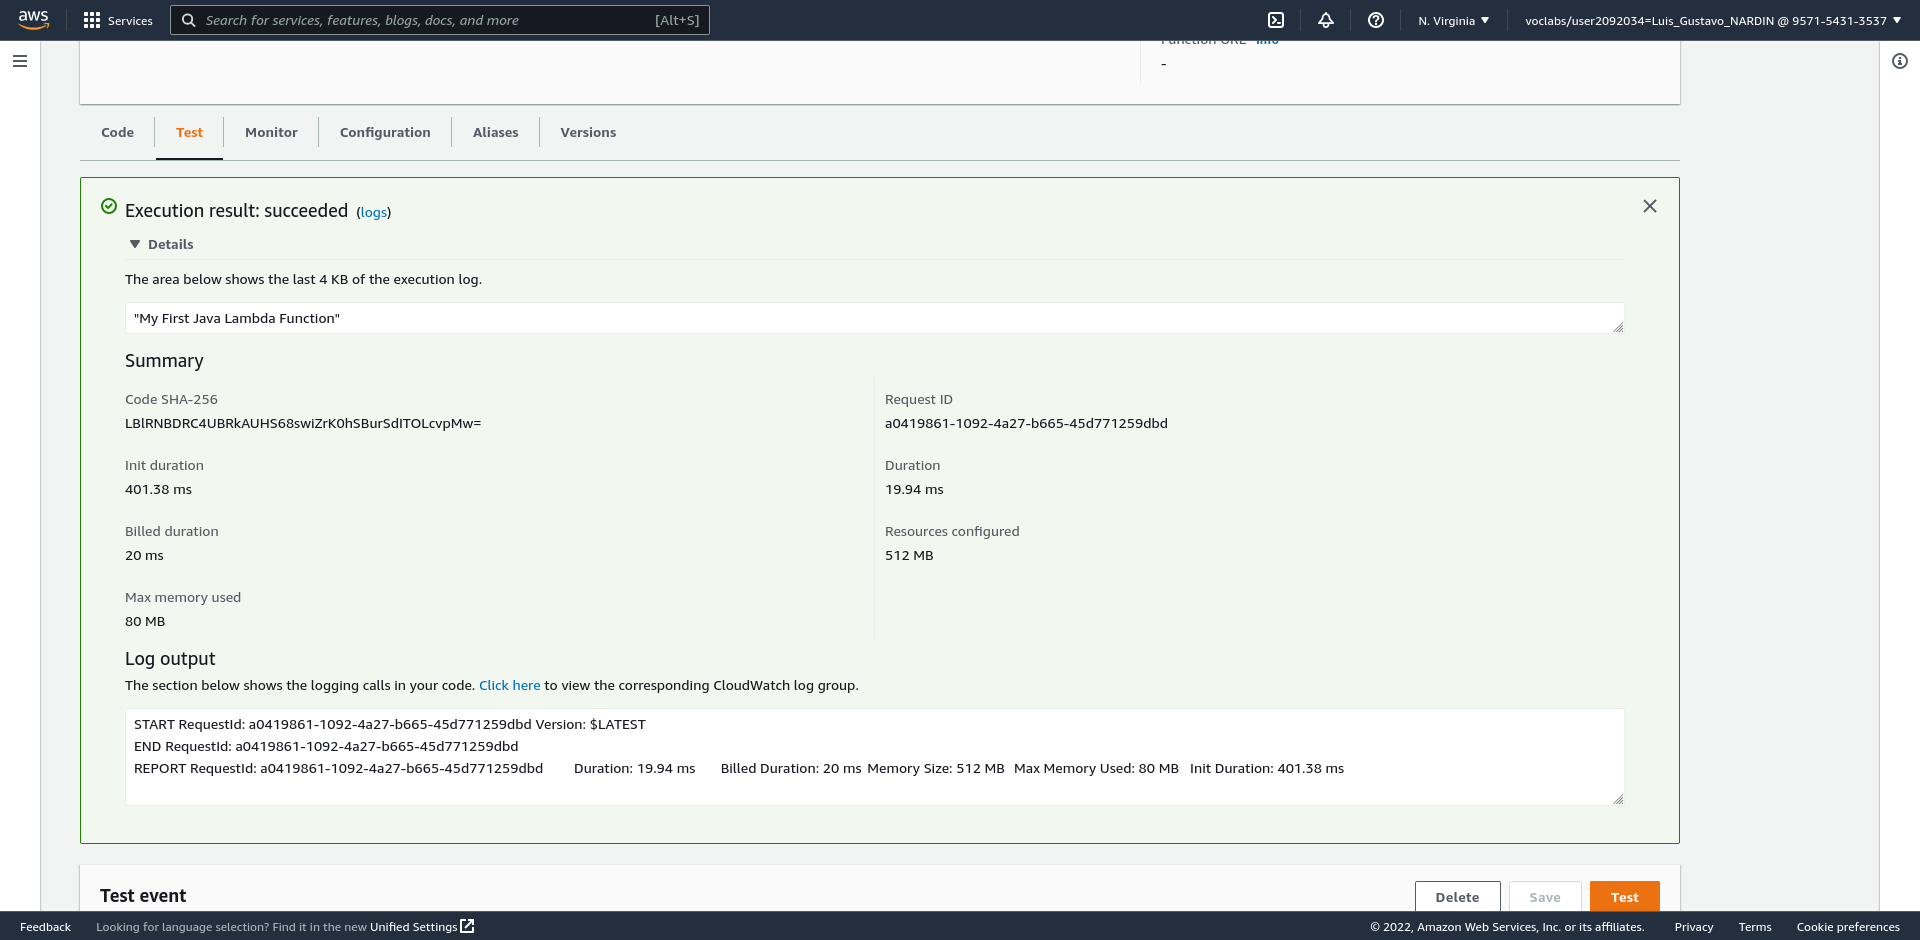
Now you can use the Monitor tab to monitor the executions' metrics (see Monitor Metrics) or logs.
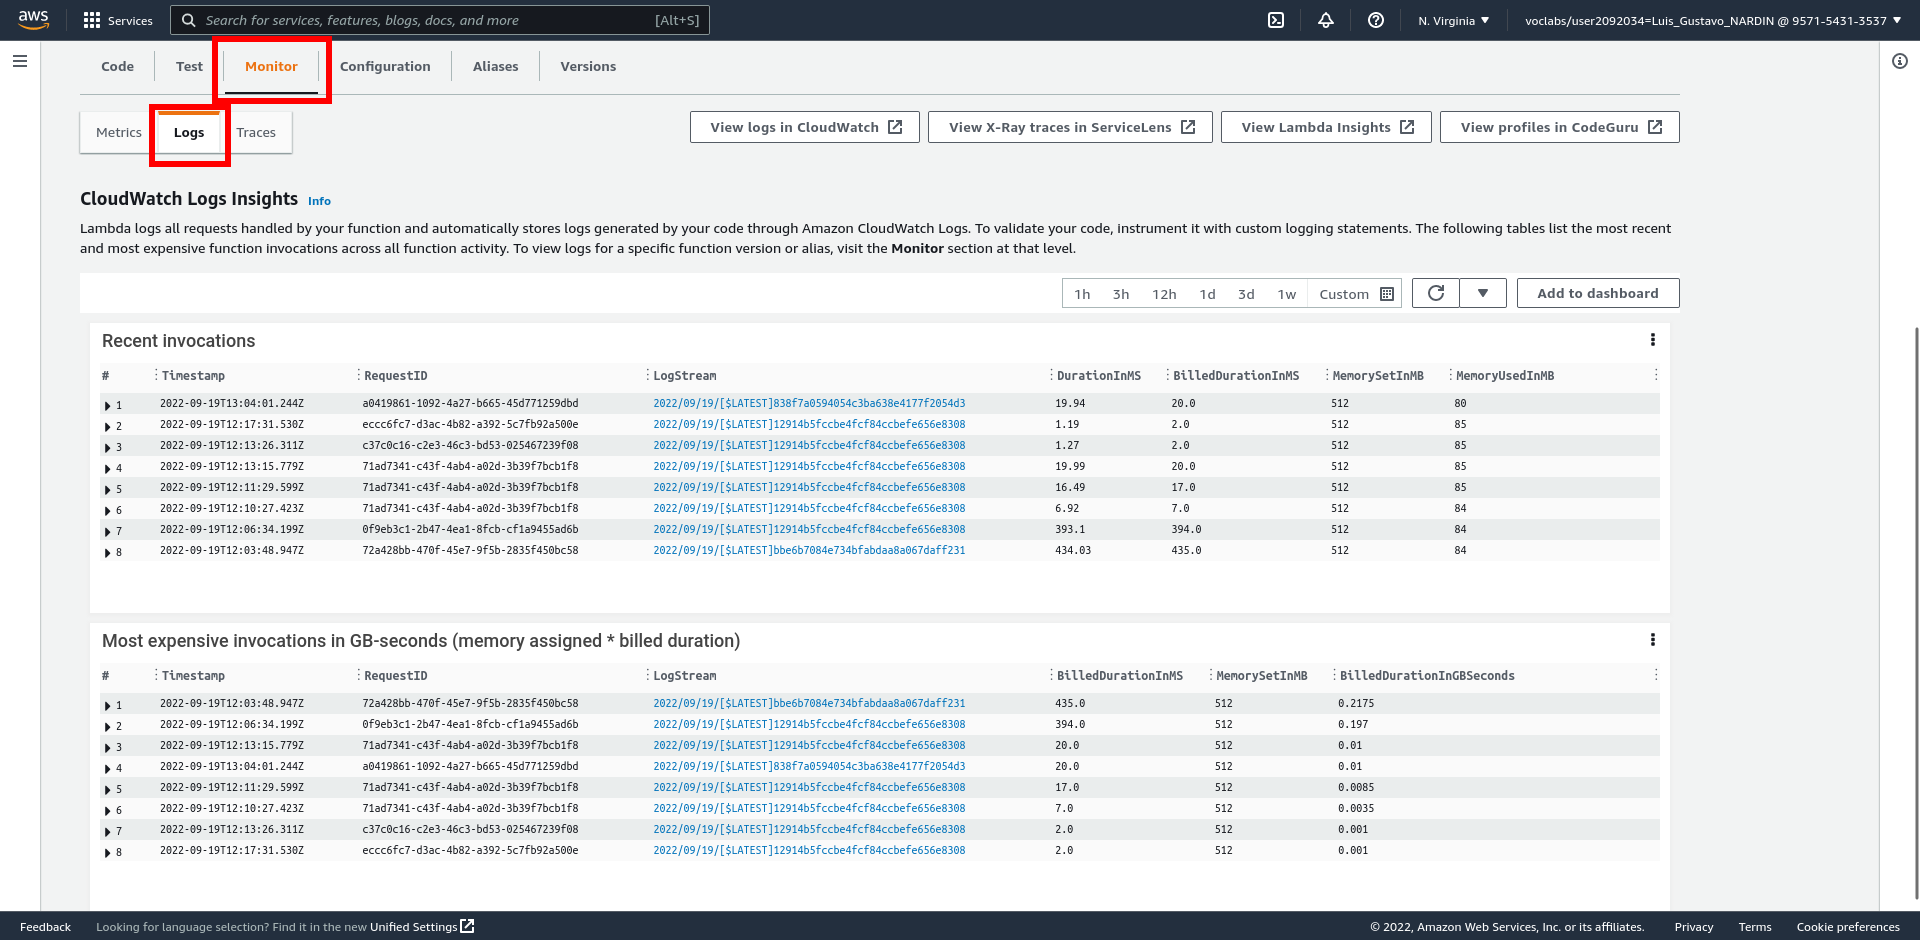
Select the link in the LogStream column to see the details of the execution, such as, the execution time or the error logs.
Triggering Lambda Function
The Lambda Function can be triggered manually as presented in the previous sections, but this approach is simply for testing. In a real environment, there are several sources of events that can trigger a Lambda Function, e.g., AWS Service events and Application events. You can also explicitly invoke a function programmatically.
A Lambda Function can be configure to be triggered by more than one event.
In this section, you will configure the Lambda Function to trigger to the upload of a .csv file in a Amazon S3 bucket.
-
Open the S3 Management Console
-
Create a new bucket
-
Open the Lambda Management Console
-
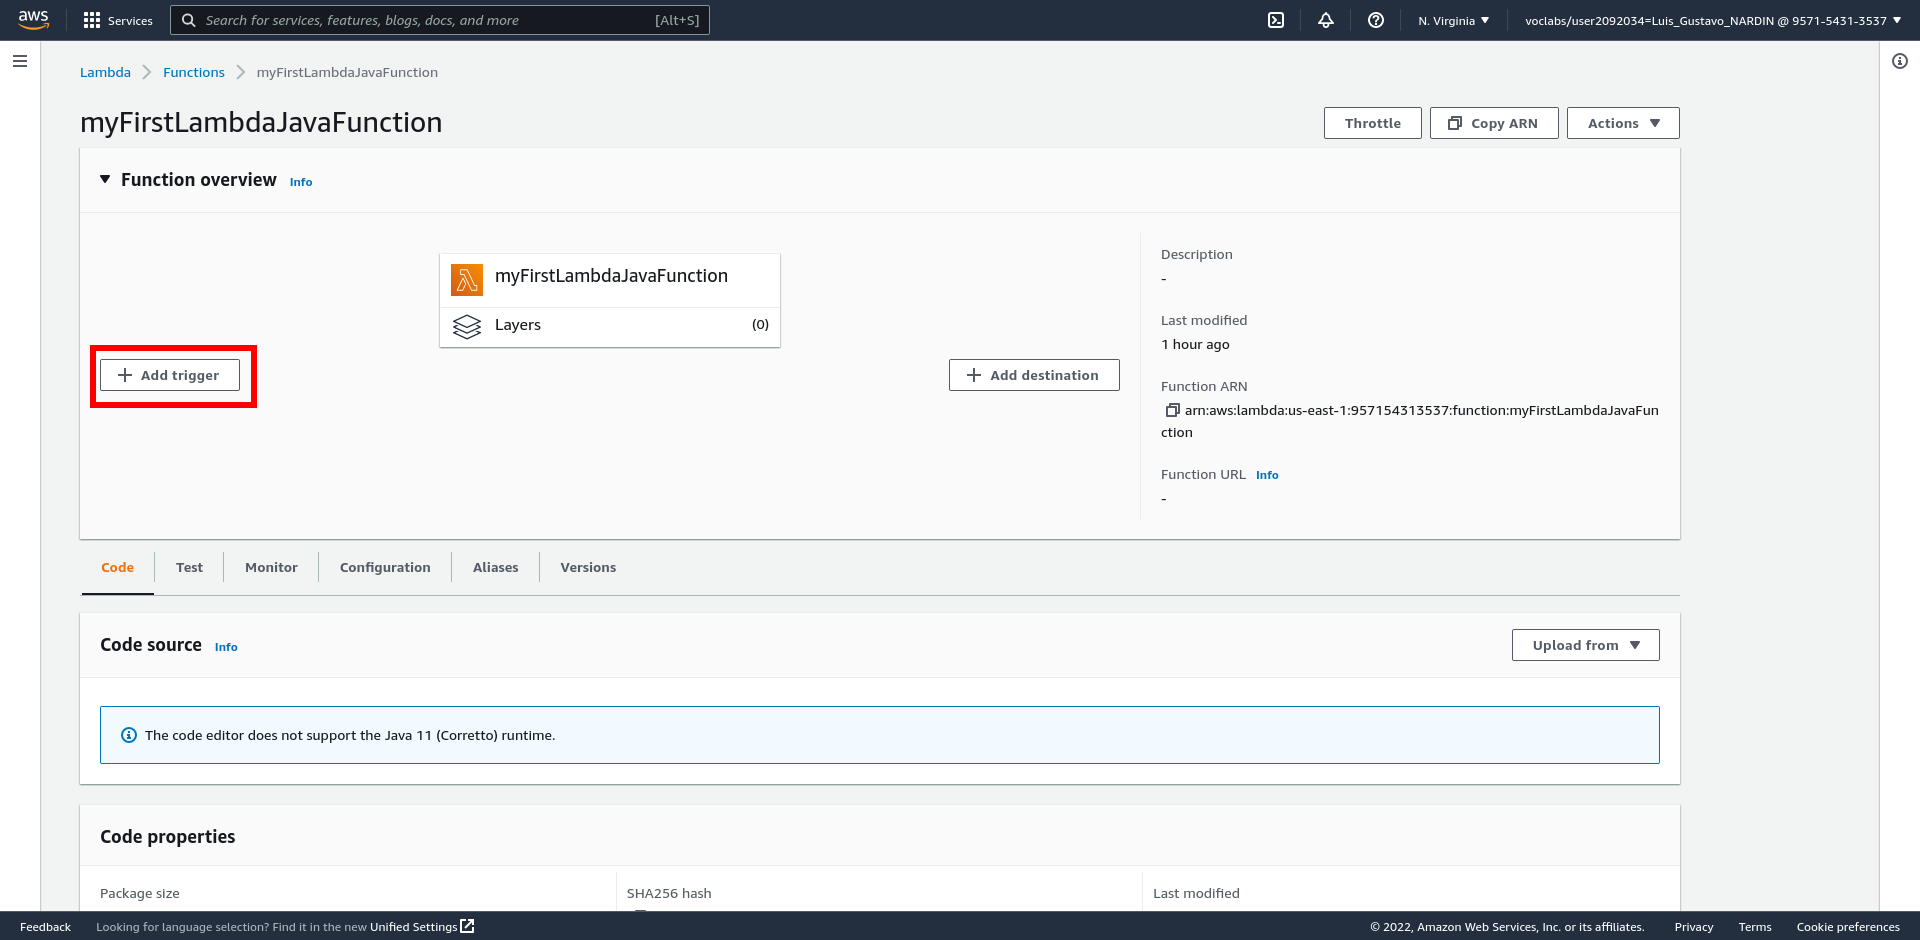
Select the myFirstLambdaJavaFunction Lambda Function
-
Select the Add Trigger button
-
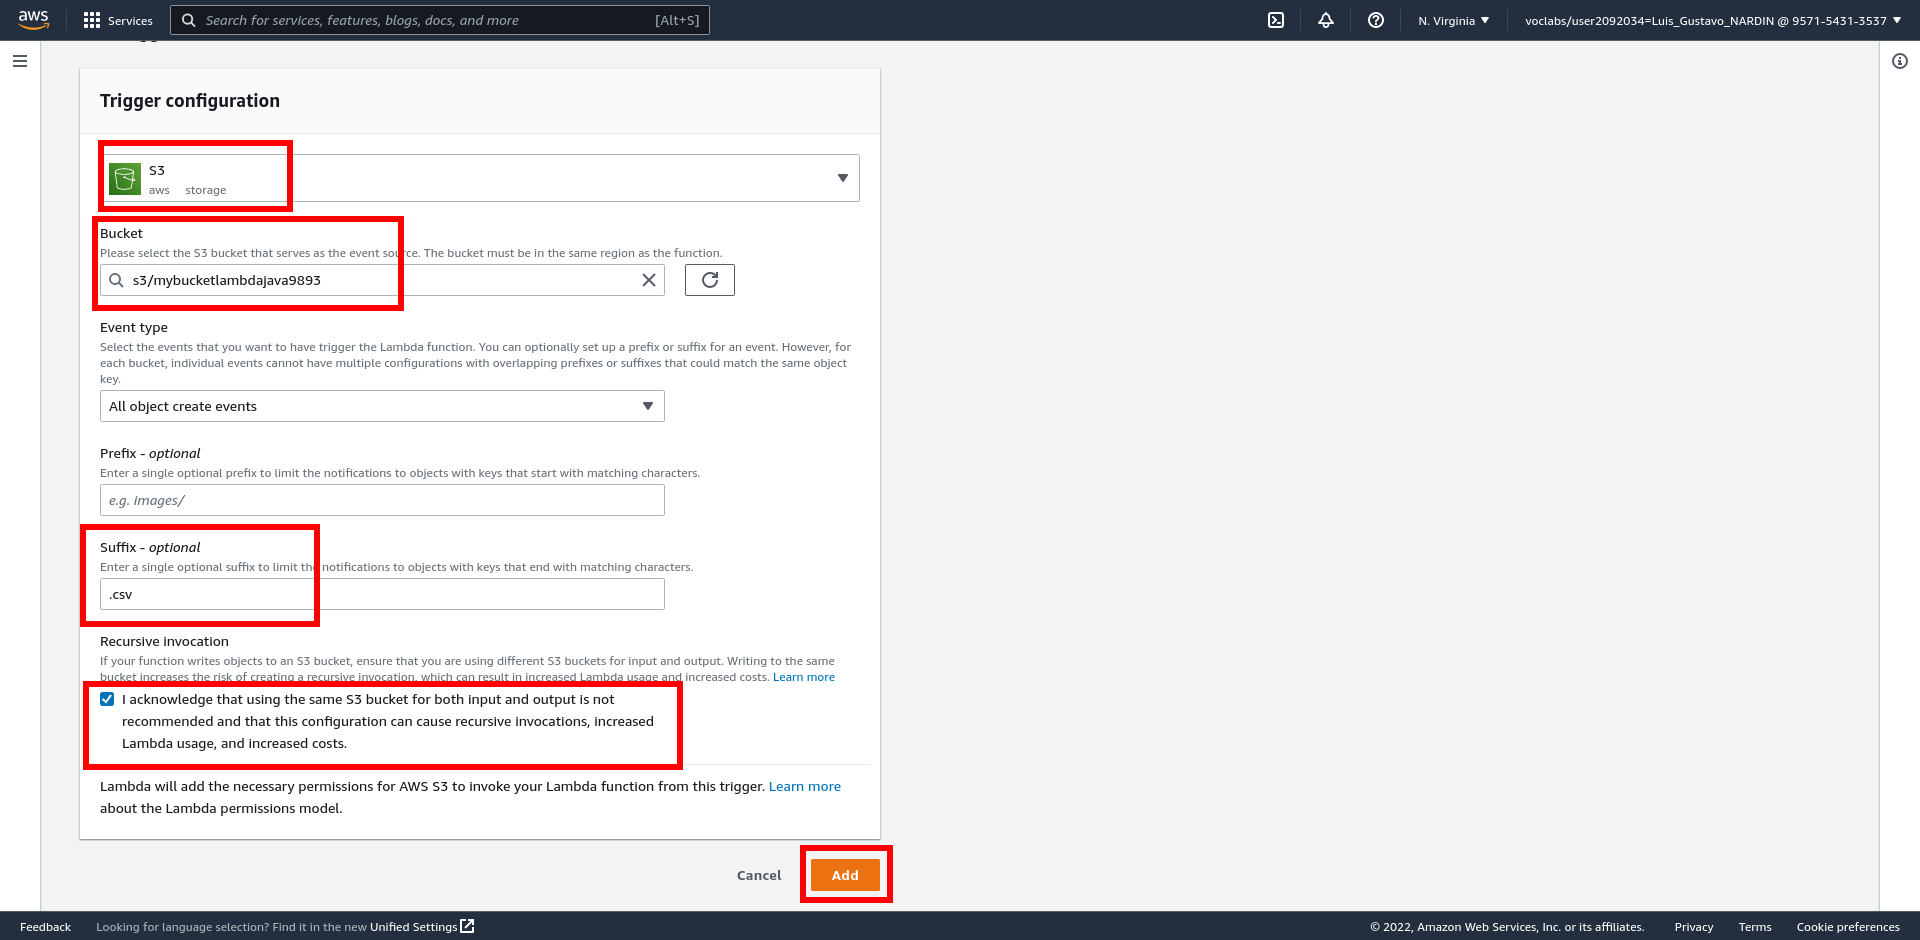
Set the trigger with the configuration
-
Select a source: S3
-
Bucket: Select the name of the bucket you just created
-
Suffix: .csv
-
Check the acknowledgement box
-
Select the Add button
-
-
Upload the file values.csv into the bucket
The Lambda Function generates an exception because the Java code is expecting a String, but the trigger event is passing an object that represents the S3 PUT event.
Hence, you need to change the POM file to import the S3 event packages and the Java code to deal with these S3 events.
-
Confirm that you have the entries in the POM file in between
<dependencies>and</dependencies>in the POM file.<dependency> <groupId>com.amazonaws</groupId> <artifactId>aws-lambda-java-core</artifactId> <version>1.2.3</version> </dependency> <dependency> <groupId>com.amazonaws</groupId> <artifactId>aws-lambda-java-events</artifactId> <version>3.11.3</version> </dependency> <dependency> <groupId>com.amazonaws</groupId> <artifactId>aws-java-sdk-s3</artifactId> </dependency>These packages define the S3 classes. For instance, the
aws-lambda-java-eventspackage defines the S3 Put type that will be used in the handler function. -
Add the
maven-shade-pluginin between<plugins>and</plugins>so theS3Eventis packaged into thejar. If you do not do this for non-built-in packages, you will get an error that the class cannot be found.<plugin> <groupId>org.apache.maven.plugins</groupId> <artifactId>maven-shade-plugin</artifactId> <version>3.5.1</version> <configuration> <createDependencyReducedPom>false</createDependencyReducedPom> </configuration> <executions> <execution> <phase>package</phase> <goals> <goal>shade</goal> </goals> </execution> </executions> </plugin> -
Update the Java code.
package fr.emse.lambda;

import java.io.BufferedReader;
import java.io.IOException;
import java.io.InputStreamReader;
import java.nio.charset.StandardCharsets;

import com.amazonaws.services.lambda.runtime.Context;
import com.amazonaws.services.lambda.runtime.RequestHandler;
import com.amazonaws.services.lambda.runtime.events.S3Event;
import com.amazonaws.services.lambda.runtime.events.models.s3.S3EventNotification.S3EventNotificationRecord;
import com.amazonaws.services.s3.AmazonS3;
import com.amazonaws.services.s3.AmazonS3ClientBuilder;
import com.amazonaws.services.s3.model.S3Object;

public class MyLambdaFunction implements RequestHandler<S3Event, String> {

  public String handleRequest(S3Event event, Context context) {
    S3EventNotificationRecord record = event.getRecords().get(0);
    String bucketName = record.getS3().getBucket().getName();
    String fileKey = record.getS3().getObject().getUrlDecodedKey();

    AmazonS3 s3Client = AmazonS3ClientBuilder.defaultClient();
    try (final S3Object s3Object = s3Client.getObject(bucketName, fileKey);
        final InputStreamReader streamReader = new InputStreamReader(s3Object.getObjectContent(),
            StandardCharsets.UTF_8);
        final BufferedReader reader = new BufferedReader(streamReader)) {

      Integer[] values = new Integer[4];
      values[0] = 0; // total
      values[1] = 0; // count
      values[2] = Integer.MAX_VALUE; // min
      values[3] = Integer.MIN_VALUE; // max

      reader.lines().forEach(line -> {
        int value = Integer.parseInt(line);
        values[0] += value;
        values[1] += 1;
        if (values[2] > value) {
          values[2] = value;
        }
        if (values[3] < value) {
          values[3] = value;
        }
      });

      System.out.println("Count: " + values[1] + " Sum: " + values[0] + " Avg: " + values[0] / (double) values[1]
          + " Min: " + values[2] + " Max: " + values[3]);
    } catch (final IOException e) {
      System.out.println("IOException: " + e.getMessage());
    }

    System.out.println("Finished... processing file");
    return "Ok";
  }
}
This code receives a
S3Eventevery time an.csvfile is uploaded into the S3 bucket. Once received, the code retrieves the bucket and file names, then download and process the file content, display the sum, average, minimum, and maximum values.NoteThe .csvfile should have a single integer number per line in order for this code to work properly. -
Package the code (see Package Code)
-
Deploy the code (see Deploy Package)
-
Delete the
values.csvfrom the S3 bucket -
Upload the
values.csvfile into the S3 bucket