This lab links to datasheets and user guides for some of the hardware in your lab briefcase. You will learn to program the ESP32 microcontroller with different operating systems.
Breadboard
Most of the hardware contained in the briefcases are plugged on a prototyping board. Ours is manufactured by BPS and is of type BB830.
Introduction to the Adafruit HUZZAH32 - ESP32 Feather
ESP32 is a series of low-cost, low-power system on a chip microcontrollers with integrated Wi-Fi and dual-mode Bluetooth (Wiki).
The main microcontroller we use is a FeatherBoard Adafruit HUZZAH32, that contains the Espressif ESP32-WROOM-32 module, a generic Wi-Fi + Bluetooth + Bluetooth Low Energy microcontroller unit. At its core, the ESP32-WROOM-32 module uses the ESP32-D0WDQ6 chip.
Here are specifications from Espressif about the ESP32:
-
240 MHz dual core Tensilica LX6 microcontroller with 600 DMIPS
-
Integrated 520 KB SRAM
-
Integrated 802.11b/g/n HT40 Wi-Fi transceiver, baseband, stack and LWIP
-
Integrated dual mode Bluetooth (classic and BLE)
-
4 MByte flash include in the WROOM32 module
-
On-board PCB antenna
-
Ultra-low noise analog amplifier
-
Hall sensor
-
10x capacitive touch interface
-
32 kHz crystal oscillator
-
3 x UARTs (only two are configured by default in the Feather Arduino IDE support, one UART is used for bootloading/debug)
-
3 x SPI (only one is configured by default in the Feather Arduino IDE support)
-
2 x I2C (only one is configured by default in the Feather Arduino IDE support)
-
12 x ADC input channels
-
2 x I2S Audio
-
2 x DAC
-
PWM/timer input/output available on every GPIO pin
-
OpenOCD debug interface with 32 kB TRAX buffer
-
SDIO master/slave 50 MHz
-
SD-card interface support
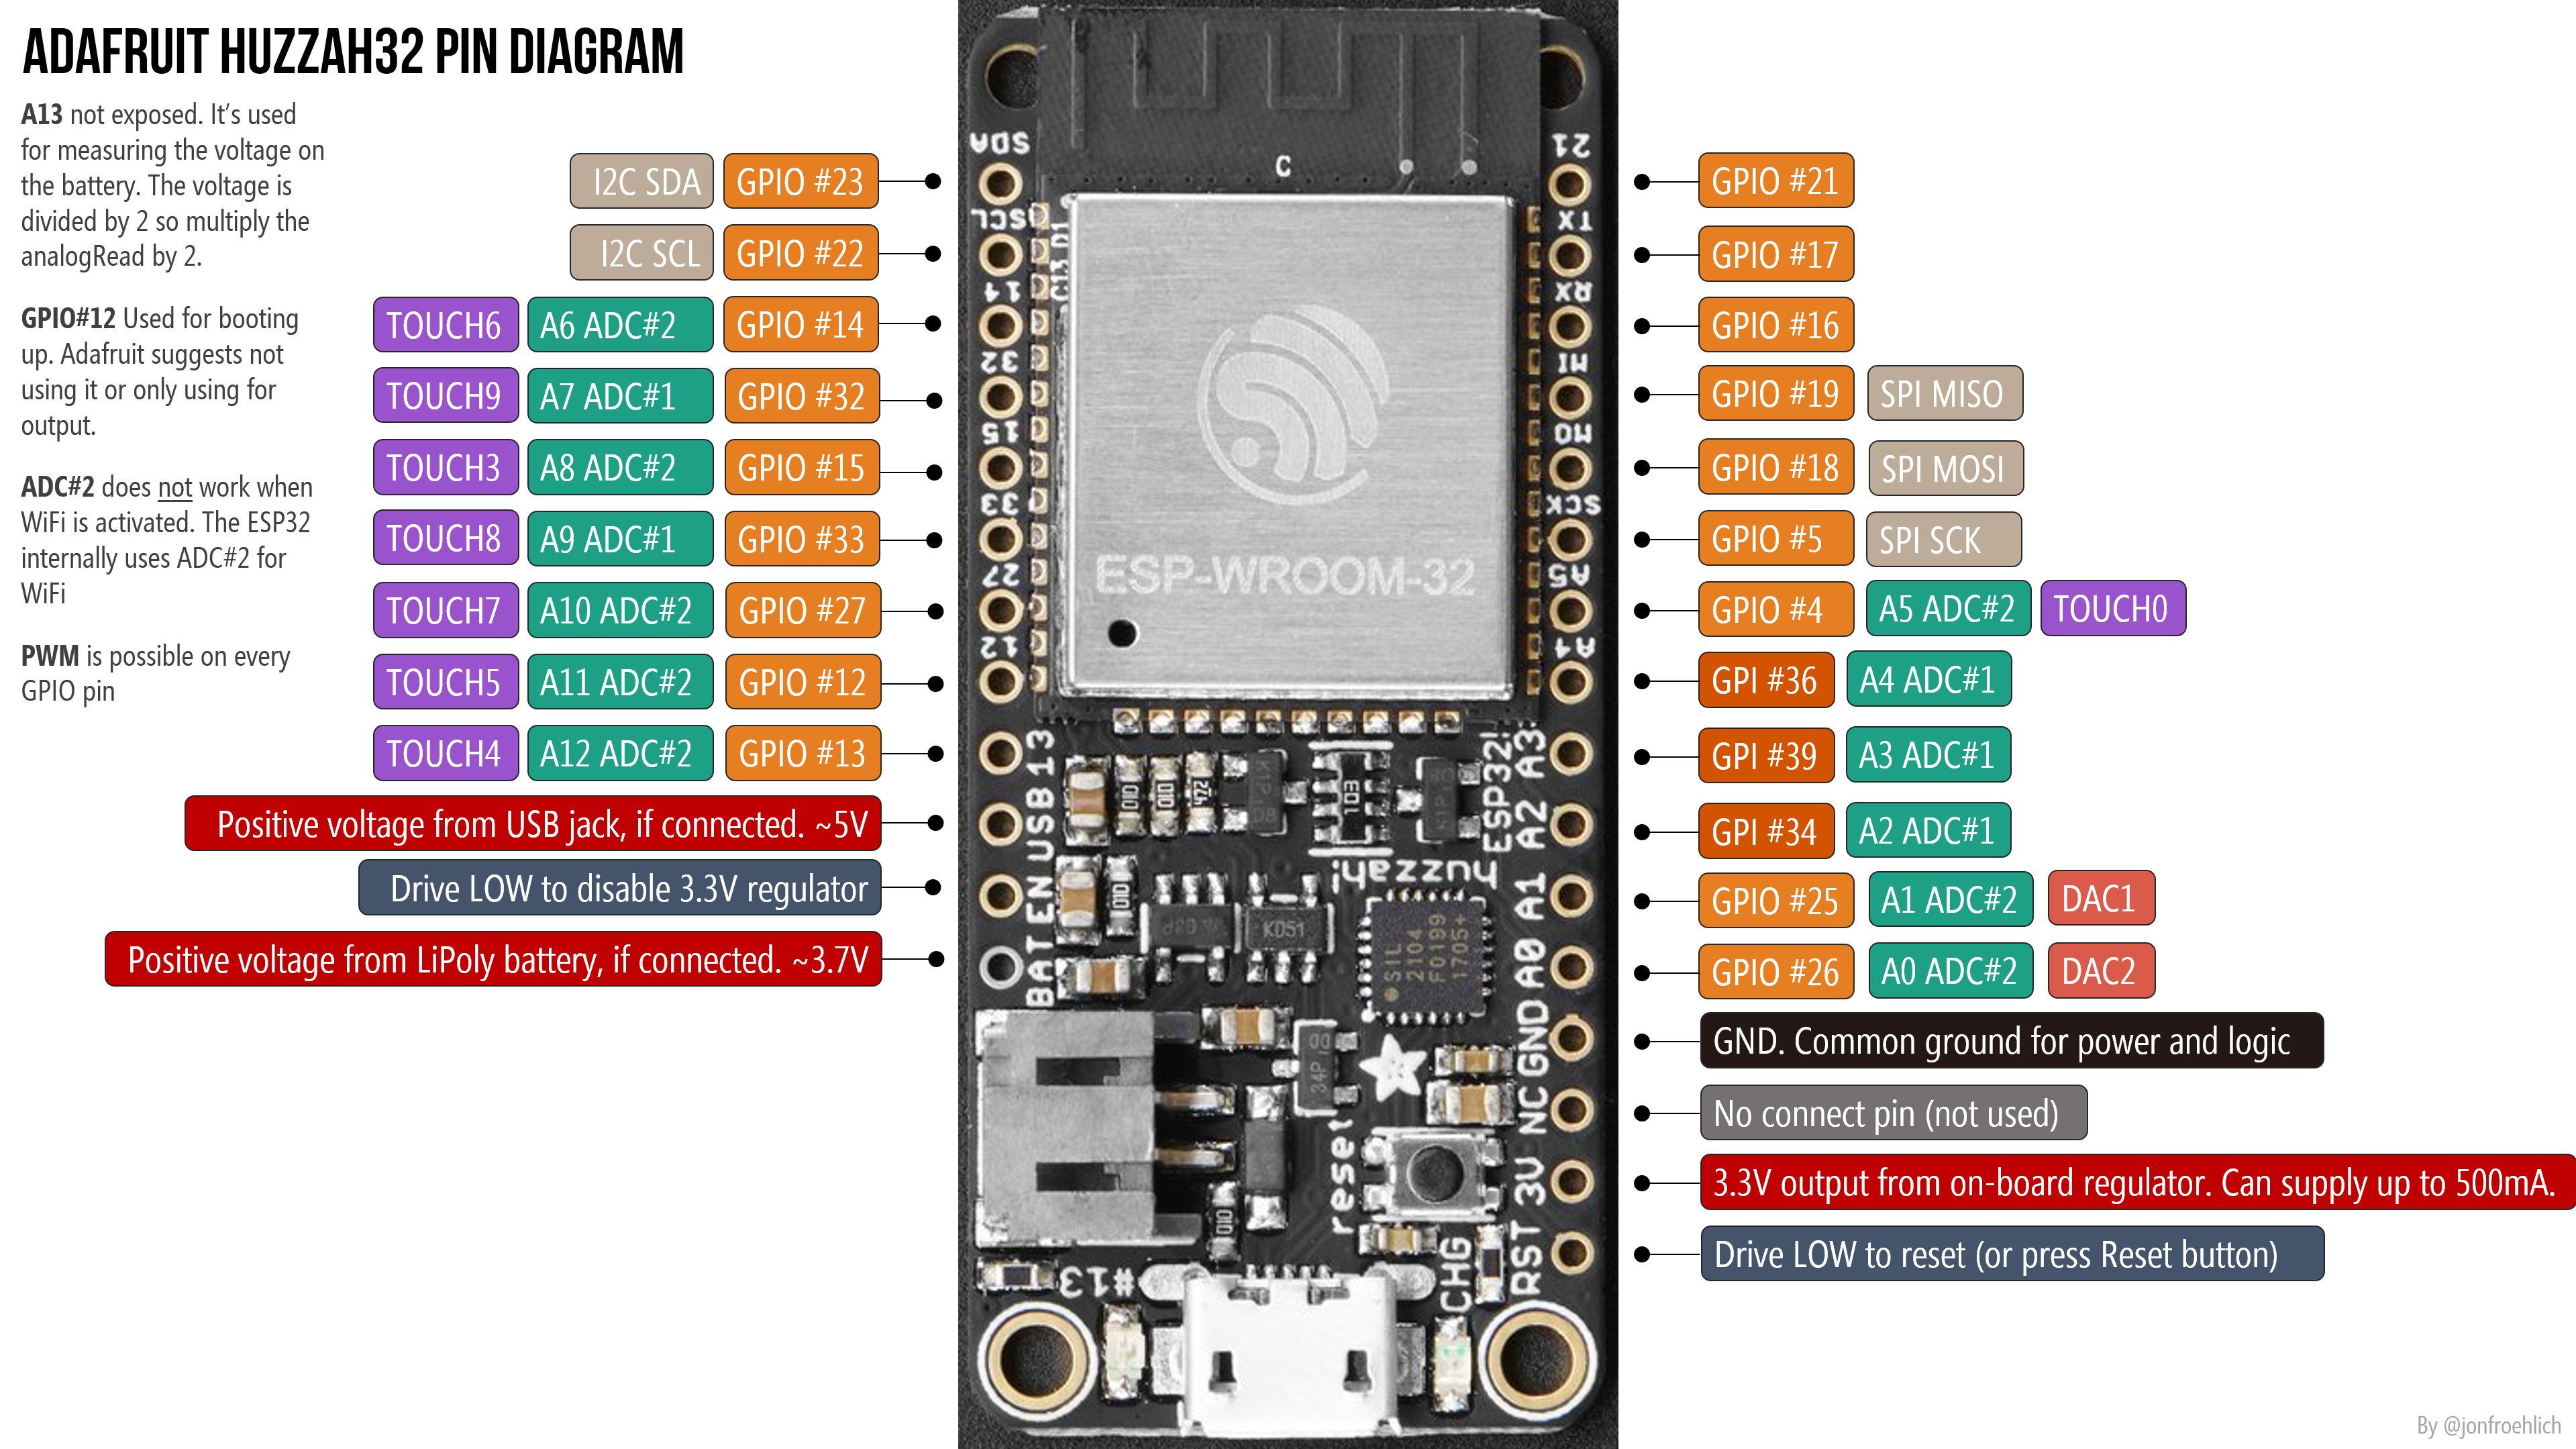
Pinouts
Read through the pinouts carefully in the Adafruit guide, and search the web for an answer to the following questions. If any doubt, ask the professor:
-
What is the USB voltage?
-
What happens if we connect
GNDandUSB? -
Which of the
SCL,SDA,SCK,MO,MI, are used for Serial Peripheral Interface communication? -
What are other names of
MOandMI? -
If we want to connect the ESP32 to another device, what could be the names of the pins to which we would connect the
MO? theMI? -
What is the voltage of GPIO \#13 when it is 'low'? 'high'?
-
What are 32 KHz crystals used for?
-
Using the default ADC resolution, what integer would we read when measuring 1V?
Make LED 13 blink with the Arduino Operating System
The Arduino IDE and environment has many drivers and libraries available. Espressif adapted the Arduino OS for the ESP32. The project documentation is available on the Espressif documentation portal. Some of the libraries are still under-documented, however there are many examples in the source code.
-
Read through the Getting Started guide
-
Select the Adafruit ESP32 Feather board (Menu → Tools → Board → ESP32 Arduino → Adafruit ESP32 Feather)
The Arduino environment is limited to just setup() and loop() and doesn’t support multi-tasking effectively.
Make LED 13 blink with the MicroPython Operating System
MicroPython is a full Python compiler and runtime that is optimized to run on microcontrollers. One can use an interactive prompt (the REPL) to execute commands immediately.
-
Get familiar with the sections of the MicroPython documentation
-
Install MicroPython and get started with MicroPython on the ESP32
-
Check out the general board controls for Pins and GPIO, and make the built-in LED 13 blink.
Make LED 13 blink with the ESP-IDF Operating System (hardcore)
ESP-IDF is the official development framework for the ESP32. It is based on FreeRTOS, which support multi-tasking: it allows multiple programs or threads to execute at the same time. ESP-IDF stands for Espressif IoT Development Framework (esp-idf). The project documentation is available on the Espressif documentation portal.
-
Follow the Installation step by step guide
-
Make the built-in LED 13 blink again. Search for the commands in the official documentation to check how they can be used.
Buttons
The briefcase should contain two Omron tactile buttons from the B3F series: one B3F 1022 (grey), and one B3F 1025 (pink)
I recommend to follow this tutorial to learn about using push buttons with ESP32: GPIO pins as digital input.
The following tutorial illustrates the same concepts with MicroPython.
|
Warning
|
the digital input pins must be configured with a pull-up resistor, so that they are high when the push button does not force them to zero. |
Digital Humidity and Temperature sensor
The briefcase should contain a digital humidity and temperature sensor of type DHT22.
I recommend the following tutorial by adafruit to start using the DHT22
The following tutorial illustrates the same concepts with MicroPython.
Potentiometer
The briefcase should contain a blue Adafruit 356 10 KOhm potentiometer
I recommend the following tutorial to start using the potentiometer
The following tutorial illustrates the same concepts with MicroPython.
Intelligent WS2812B control LED
The briefcase should contain a controllable RGB LED of type WS2812B, soldered on a breakout board (see schema), and controllable with a ad-hoc protocol.
I recommend the following tutorial to start controlling the WS2812B LED
The following tutorial illustrates the same concepts with MicroPython.
OLED Display
The briefcase should contain a 128x64 OLED FeatherWing (or 128x32), stacked on the HUZZAH32 FeatherBoard, and controllable with either the SPI or the I²C serial protocol. The 128x64 OLED display module is named SSD1306. The 128x32 OLED display module is named UG-2832HSWEG02.
I recommend the following tutorial to learn and start controlling the OLED display
The following tutorial illustrates the same concepts with MicroPython.
|
Warning
|
Watch out: only the library SH1107 works. Not the SSD1306. |
External resources
Follow this tutorial on GPIOs
TODO for the 15/10
Program the microcontroller such that:
-
After 20 seconds of inactivity, the microcontroller falls into deep sleep.
-
Pushing the black button makes the device wake up and display the current menu option.
-
Pushing again on the black button displays the next menu option.
-
Turning the potentiometer changes the dim, or the color.
-
Menu options are: 1. display temperature and humidity, 2. change temperature F°/C°, 3. turn the light on/off, 4. change potentiometer action: dim/set color, 5. sleep.
-
Menu options can be selected using the pink button.
Conclusion
With this lab you got familiar with the ESP32 microcontroller, and some of the basic input and output peripherals that you can use to interact with your future IoT application.