Introduction
This lab provides instructions for installing the tools to access the AWS Services via command-line (AWS Command Line Interface) and programmatically (AWS SDK for Java).
AWS CLI
By the end of this section, you will be able to:
-
Install AWS Command Line Interface
-
Access the AWS Services via command-line
So far, everything was done using AWS Console. While user friendly, it prevents from developing more complex systems or simply using automation, see the AWS Command Line Interface (CLI). This section aims to discover the AWS CLI.
Install
-
Install AWS CLI Version 2 following the instructions here
-
Proceed with the configuration of the AWS CLI
-
type
aws configurein a terminal. AWS is going to ask for your credential information. This information can be accessed by clicking on the top-right username → My Security Credentials. Open the session Access keys (access key ID and secret access ID), click on Create New Access Key. -
Enter the Access Key and Secret Key
-
Set the Default region name to us-east-1
-
Set the Default output format to json
-
Finally you are ready to go!
TipIn AWS Academy, you find the credentials in the AWS Details option of the Learner Lab Console (see Setup AWS Academy Account).
-
Use
The AWS CLI is a unified tool to manage AWS services. The command syntax is
aws [options] <command> <subcommand> [parameters]Enter the commands below and check their output.
-
List all EC2 images available
-
aws ec2 describe-images
-
-
List a specific EC2 image
-
aws ec2 describe-images --image-ids ami-05fa00d4c63e32376
-
-
Create an EC2 instance
-
aws ec2 run-instances --image-id ami-05fa00d4c63e32376 --count 1 --instance-type t2.micro --key-name vockey
-
-
Store the InstanceId
-
Start EC2 instance
-
aws ec2 start-instances --instance-ids i-0a35578dcaf09ce5b
-
-
Terminate EC2 instance
-
aws ec2 terminate-instances --instance-ids i-0a35578dcaf09ce5b
-
-
List all the S3 buckets
-
aws s3 ls
-
-
Create an S3 bucket
-
aws s3 mb s3://b098429742
-
-
Using any text editor, create a file called file.txt
-
Copy the local file file.txt to the newly created S3 bucket
-
aws s3 cp file.txt s3://b098429742/file.txt
-
-
Delete file in S3 bucket
-
aws s3 rm s3://b098429742/file.txt
-
-
Delete the S3 bucket
-
aws s3 rb s3://b098429742
-
AWS SDK for Java
By the end of this section, you will be able to:
-
Create users and groups and assign specific permissions
-
Install AWS IDE Toolkit
-
Develop Java applications to access individual AWS services
Prerequisites
-
Java 17+
-
Apache Maven 3.9.5+
Create an IAM group and user
|
Tip
|
In AWS Academy, there is no need to create a new user and group. The instructions were left here so you can understand what is required in the "normal" AWS. You find the credentials in the AWS Details option of the Learner Lab Console (see Setup AWS Academy Account). |
-
In the AWS Management Console, navigate to the IAM console by entering IAM in the Service search bar
-
In the navigation panel in the left, select User groups. The click on Create group
-
Enter the student-group in the User group name
-
In the Attach permission policies - Optional, select the checkboxes for the AmazonS3FullAccess, AmazonEC2FullAccess, and AmazonSQSFullAccess
-
Clink on Create group
-
In the navigation panel in the left, select Users. The click on Add user
-
Enter the student in the User name and select the Access key - Programmatic access checkbox.
-
Click on Next: Permissions
-
Under Set permissions, select Add user to group
-
In the list of groups, select the checkbox for the student-group group
-
Click on Next: Tags
-
Click on Next: Review
-
Click on Create user
-
On the Success Screen, choose Download .csv
|
Important
|
The downloaded file contains the Access Key ID and the Secret Access Key. Treat your Secret Access Key as a password; save in a trusted location and do not share it. You will not have another opportunity to download or copy the Secret Access Key. |
IDE AWS Toolkits
Setting up
To install the AWS IDE Toolkits, follow the instructions at AWS IDE Toolkits.
|
Important
|
You can choose your preferred IDE to install the AWS IDE Toolkit. But the instructions in this course will be given for the Visual Studio Code (VSCode). In addition to the AWS Toolkit extension, you should also install the Extension Pack for Java on the VSCode. |
Usage
After successfully conclude the AWS IDE Toolkit extension installation on VSCode
-
Select the AWS icon in the Activity bar (left-side bar)
-
Select the Connected with … option
-
Choose profile:default IAM Credential, configured locally (~/.aws/config) option in the drop-down menu
-
Expand the S3
-
Select Create Bucket icon
-
Enter newbucket[RANDOM] where [RANDOM] should be replaced by a random number
|
Note
|
AWS IDE Toolkit allows the execution of several management actions on AWS. Be careful because the actions are actually executed in the AWS. |
Create AWS Java Project
In this section, you will learn how to use the AWS SDK for Java 2.x to interact with the AWS services. In addition to Java, AWS also provides API support for C++, Go, JavaScript, Kotlin, .NET, Node.js, PHP, Python, Ruby, Rust, and Swift (see Tools to Build on AWS for further details).
-
Press
Crtl+Shift+Pand enter → Java: Create Java Project… -
Select Maven create from archetype option
-
Select No Archetype…
-
Enter fr.emse for group Id
-
Enter aws-cloud for artifact Id
-
Open the
pom.xmlfile and replace its content by<?xml version="1.0" encoding="UTF-8"?> <project xmlns="http://maven.apache.org/POM/4.0.0" xmlns:xsi="http://www.w3.org/2001/XMLSchema-instance" xsi:schemaLocation="http://maven.apache.org/POM/4.0.0 https://maven.apache.org/xsd/maven-4.0.0.xsd"> <modelVersion>4.0.0</modelVersion> <groupId>fr.emse</groupId> <artifactId>aws-cloud</artifactId> <version>1.0-SNAPSHOT</version> <build> <sourceDirectory>src/main/java</sourceDirectory> <plugins> <plugin> <artifactId>maven-compiler-plugin</artifactId> <version>3.11.0</version> <configuration> <release>17</release> </configuration> </plugin> <plugin> <groupId>org.apache.maven.plugins</groupId> <artifactId>maven-shade-plugin</artifactId> <version>3.5.1</version> <configuration> <createDependencyReducedPom>false</createDependencyReducedPom> </configuration> <executions> <execution> <phase>package</phase> <goals> <goal>shade</goal> </goals> </execution> </executions> </plugin> </plugins> </build> <properties> <java.version>17</java.version> </properties> <dependencyManagement> <dependencies> <dependency> <groupId>software.amazon.awssdk</groupId> <artifactId>bom</artifactId> <version>2.21.22</version> <type>pom</type> <scope>import</scope> </dependency> <dependency> <groupId>com.amazonaws</groupId> <artifactId>aws-java-sdk-bom</artifactId> <version>1.12.588</version> <type>pom</type> <scope>import</scope> </dependency> </dependencies> </dependencyManagement> <dependencies> <dependency> <groupId>software.amazon.awssdk</groupId> <artifactId>ec2</artifactId> </dependency> <dependency> <groupId>software.amazon.awssdk</groupId> <artifactId>lambda</artifactId> </dependency> <dependency> <groupId>software.amazon.awssdk</groupId> <artifactId>regions</artifactId> </dependency> <dependency> <groupId>software.amazon.awssdk</groupId> <artifactId>s3</artifactId> </dependency> <dependency> <groupId>software.amazon.awssdk</groupId> <artifactId>sqs</artifactId> </dependency> <dependency> <groupId>software.amazon.awssdk</groupId> <artifactId>sns</artifactId> </dependency> <dependency> <groupId>com.amazonaws</groupId> <artifactId>aws-java-sdk-s3</artifactId> </dependency> <dependency> <groupId>com.amazonaws</groupId> <artifactId>aws-lambda-java-core</artifactId> <version>1.2.3</version> </dependency> <dependency> <groupId>com.amazonaws</groupId> <artifactId>aws-lambda-java-events</artifactId> <version>3.11.3</version> </dependency> </dependencies> </project>
Handling S3 Buckets and Objects (Example)
-
Under the
src/main/java/fr/emsefolder-
delete the Main.java file
-
create a new folder s3
-
create a new file named S3ListBuckets.java inside the s3 folder
-
-
Paste the following code in the S3ListBuckets.java
 1
 2
 3
 4
 5
 6
 7
 8
 9
10
11
12
13
14
15
16
17
18
19
20
21
package fr.emse.s3;

import software.amazon.awssdk.regions.Region;
import software.amazon.awssdk.services.s3.S3Client;
import software.amazon.awssdk.services.s3.model.ListBucketsRequest;
import software.amazon.awssdk.services.s3.model.ListBucketsResponse;

public class S3ListBuckets {

  public static void main(String[] args) {
    Region region = Region.US_EAST_1;

    S3Client s3 = S3Client.builder().region(region).build();

    ListBucketsRequest listBucketsRequest = ListBucketsRequest.builder()
        .build();
    ListBucketsResponse listBucketResponse = s3.listBuckets(listBucketsRequest);
    listBucketResponse.buckets().stream()
        .forEach(x -> System.out.println(x.name()));
  }
}
then, change the Region in line 10 by your account region, if needed
-
Choose Run on top of the
public static void main(String[] args)method -
The list of buckets should be displayed in the TERMINAL panel
|
Note
|
The message below is NOT an error. This message is displayed because no logger has been defined. |
|
Note
|
Further information and examples of code to access AWS services are available at Working with AWS services. |
Task 1: Handling VM Instances
-
Write a Java program that creates an EC2 instance using the AMI ID passed via argument. NOTE To create the EC2 instance, you will have to inform the Image Id (i.e., AMI ID). You can find the AMI ID in the first screen after you Launch Instance in the AWS Management Console (see Figure 1).
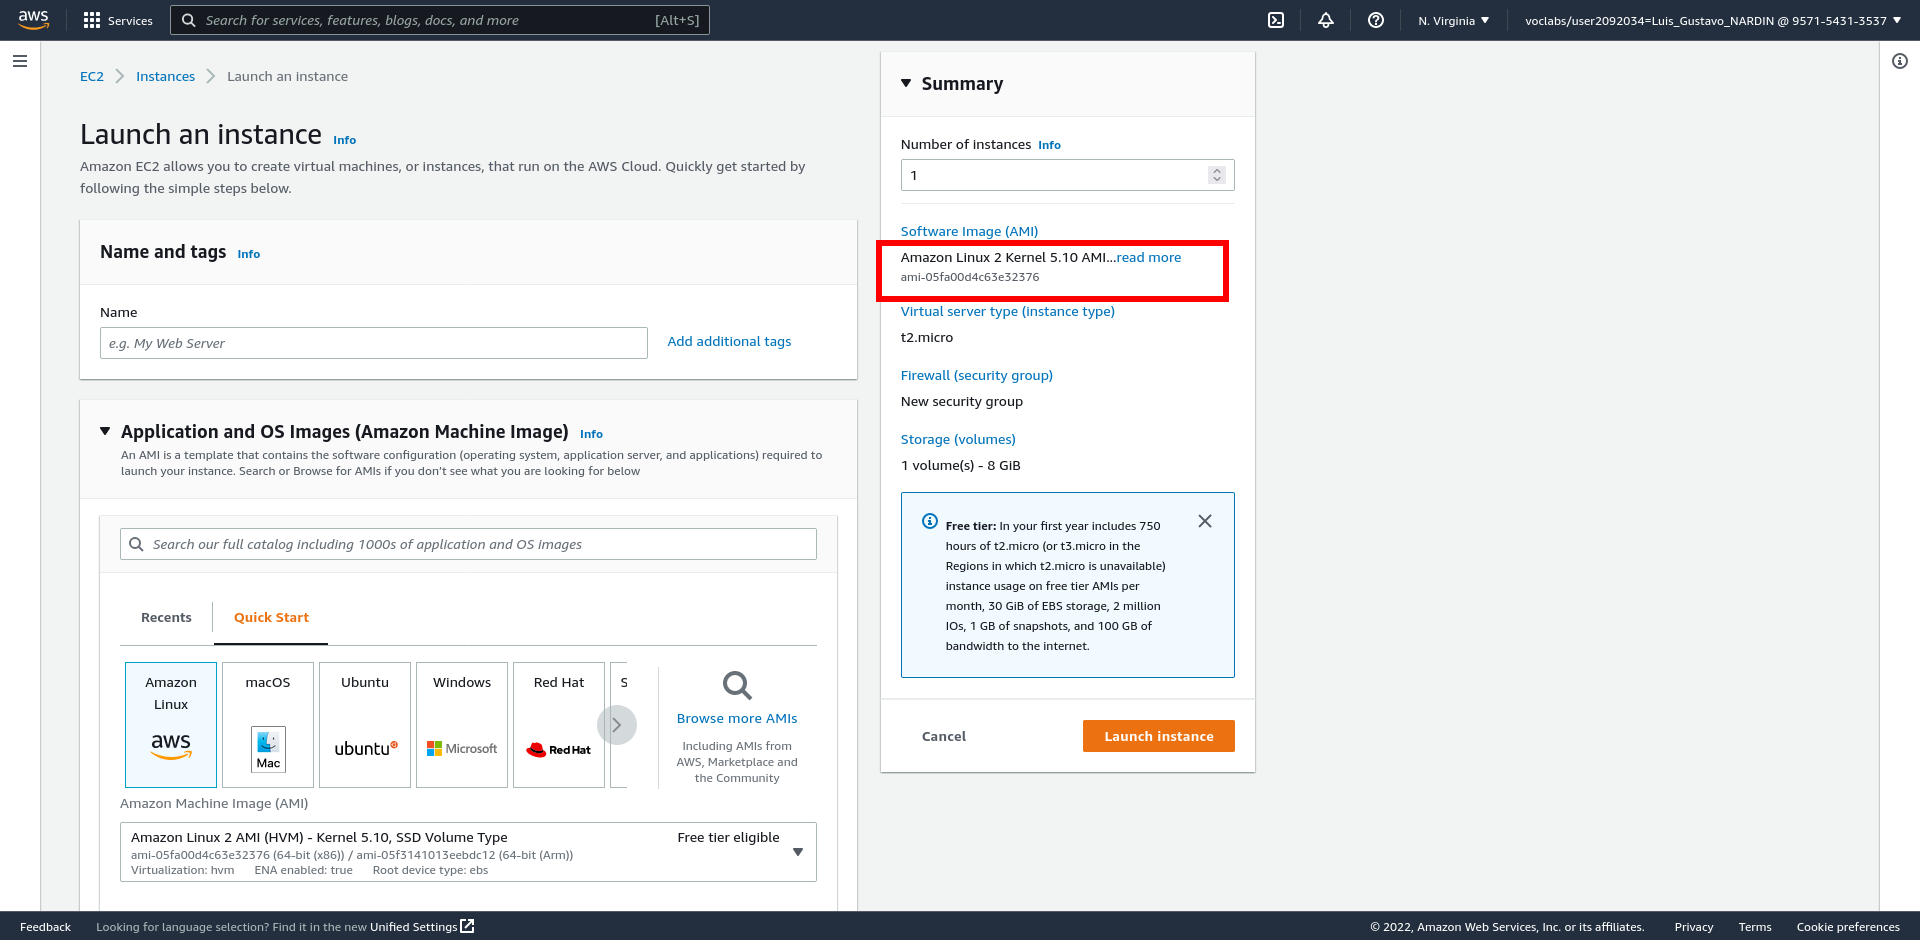 Figure 1. Finding the Image Id
 -
Write another Java program that
-
starts the EC2 instance if the instance is stopped, and
-
stops the EC2 instance if the instance is started.
-
|
Tip
|
Use methods DescribeInstanceStatusRequest, Filter, DescribeInstanceStatusResponse, StartInstancesRequest, and StopInstancesRequest.
|
Task 2: Handling Storage
-
Download the file values.csv to your local computer
-
Create a Java program that
-
check if a bucket exists in the Amazon S3, whose name must be passed as argument
-
if not, create the bucket in the Amazon S3
-
upload the
values.csvfile to the bucket (NOTE: File path must be passed as argument)
-
-
Create another Java program that
-
check if the
value.csvfile exists in the bucket in the Amazon S3 (NOTE: The bucket name must be passed as argument) -
retrieve the
value.csvfile from the Amazon S3 -
delete the file from the Amazon S3
-